Showing posts with label Melanie Testa. Show all posts

19 May 2015

Breast Pocket Update

I just realised that it's been two months since my last blog entry. Time has flown, and I've discovered that Instagram has taken over some of the role that this blog used to have. I find that I spend less and less time on writing blog entries and reading other people's blogs, and I've wondered if it's the same for others too, or if it's just me. I think I'm searching for a new direction with this blog, to make it feel more worthwhile. In the meantime, Instagram has swooped in and is carrying the torch. My Instagram alias is annika.c.lund, if you'd like to visit me there.

You may remember that I've talked about Melanie Testa's Breast Pocket Project several times before (click the label 'Breast pocket projcet' in the list, or follow this link). It's a project to raise awareness about breast cancer, and in particular about women like Melanie, who choose not to have reconstructive surgery or prosthetics after a mastectomy. She wants to turn the repressive body image pressures off for women. Women should be allowed to feel sexy, strong and beautiful whether full, flat or half flat. So she started the Breast Pocket Project with the aim to gather in 1 000 breast pockets for an art project.

In the October/November 2014 issue of Quilting Arts Magazine there was a Reader Challenge that called for breast pockets in honor and support of all who are or have been touched by breast cancer. The challenge was connected to Melanie and the Breast Pocket Project, and all the pockets that were submitted were to be donated to her project. 

I participated in this challenge, and imagine my joy when I discovered that my breast pocket was among the 40 pockets that were included in the magazine (April/May 2015 issue)! A total of 250 pockets were submitted. Here's a scan from the magazine (don't you just love the embroidered cloth they used for the background?):


The pockets that weren't included in the magazine can be seen online as a free eBook, if you're a member of the Quilting Daily online community (it's free to join). Check it out by following this link.

And if you haven't already, check out Melanie's Breast Pocket Project, and send her more breast pockets! Here's a link to her blog. Click the tag 'Breast Pockets' for more information.

Thanks for visiting!

23 January 2015

Use Your Treasures!

I was inspired by a recent blog post by Melanie Testa, where she writes that she's been printing cloth for years, and now wants to use up her stash completely instead of stashing and storing fabric. I can relate to that. I have loads of my own fabrics in my stash too. Some of the cloth is ugly, some is precious to me. But the point is: there is no point in storing it. It deserves to be used! "Using the things you have and make causes you to make more, doesn’t it?" Melanie says. And she's right! Whatever fabric I've dyed or printed - I can make more of! And if there is one that is exquisitely special and unrepeatable, well, why not use it for something I use every day so that I can enjoy it all the time? Why should I keep it folded up in a box? And when I make more fabric, there will be more exquisitely special and unrepeatable fabrics to use.

So, as a warm-up, I decided to make a coaster set from some of my hand-dyed fabrics that have a Japanese feel to me. I combined them with linen as a backing fabric, as I love the combination of printed cotton and plain linen.


The techniques that have been used to pattern the fabrics are: low water immersion dyeing, shibori, direct dye painting and printing, soy wax resist and discharge. I was quite surprised by how many techniques I'd managed to tick off!


Thanks for visiting my blog! Go forth, my friend, and use your fabrics. And then: make (or buy) more lovely fabric!


20 November 2014

Breast Pockets Revisited

Two years ago I participated in Melanie Testa's Breast Pocket Project, together with a group of  students at the adult education centre where I worked at the time. If you want to revisit the blog posts I wrote then, you can check this link for information about the project and this link for an image of the breast pockets we created and sent to Melanie.

The reason I mention this is that in the October/November 2014 issue of Quilting Arts Magazine there is a Reader Challenge that calls for breast pockets in honor and support of all who are or have been touched by breast cancer. The challenge is connected to Melanie and the earlier Breast Pocket Project, as all the pockets that are submitted will be donated to her project. Every pocket will also be published either in the April/May 2015 issue of the magazine or online. The deadline is 9 December, so there's still time to join the challenge! You can find the instructions if you follow this link and some more information here.

A week ago I went on a bus trip to Tampere for the Finnish Handicrafts 2014 Fair, and as I was going to spend several hours travelling to and from the fair, I felt that a small embroidery project such as a breast pocket would be the perfect way to keep myself busy. I found a piece of fabric that I'd saved from a stamping and stencil printing demo I did earlier this autumn, and picked out some embroidery thread. I wanted a subtle effect, and went for pink and white. I also added green after I took the photograph, to create a bit of interest.


I don't have any process images this time, but I can tell you a little about the process in words instead. To be perfectly honest, it was something of a struggle for me. I soon realised that the threads I'd chosen were not just a bit too subtle, but there wasn't much I could do about that, sitting on a bus in the middle of nowhere, so I decided that I was going to have to make it work. I stitched, and tore out stitches for hours before I felt that I was on the right track. Even so, when the stitching was complete, I still felt that there wasn't enough contrast. So I got out a jar of white pearlescent fabric paint and painted a glimmering layer all over the background, stitches and all. I then took some beads to make a beaded edge, and some glitter paint to add a bit of shimmer to the countours of the main motif. Then, at last, I found my peace, and the piece was declared finished. Here's the result:

The breast pocket


I love these beaded edges


I made it to the post office just in time today, so the little pocket is already on its big journey to Massachusetts, USA. Yay!

Thanks for visiting for my blog!


1 November 2014

Still Away With The Mermaids... but...

there are also new winds blowing. Yay!

I've been very busy all autumn, working, painting, teaching, and I have hardly touched a single piece of fabric, but now that the more active part of The Mermaid Circus workshop is over (has it been 8 weeks already?!), I suddenly felt a little craving for fabric. And there happens to be something fun going on chez Melanie Testa. She has started a Sew Along for her Gather Your Sew-Plies Project Bag, which is a nifty little purse that you can strap to your body, and that will hold the stuff that you need when you are sewing on-the-go, or wherever. I want one!

The pattern is available in the Quilting Arts Holiday 2014 magazine, which is downloadable at Interweave (link), and on Melanie's blog you can follow the sew-along. Just click the tag 'Sew Along', and you'll get all the blog posts that she's written on the subject. I just had a rummage through my stash and found the perfect fabrics. I've saved them for something else, but a girl can change her mind, right?


So stay tuned for Sew Along news, or even better: JOIN IN !

Here are more mermaids that I've created in the Mermaid Circus workshop. It's been so much fun, and I've learned so much. Having a theme to work with makes such a big difference to me, as it helps me to actually get started. And of course, with a such a fun theme as mermaids, it's impossible not to be inspired!


Thanks for visiting my blog!

10 August 2014

Wake-Up Bells

Today is the final day of Festival of Quilts in Birmingham, and the winners have already been announced, so now I'm safe to publish images of the quilt that was sent there. As I've already mentioned here, the theme this year was In My Garden, and spring was the season that was given to Finland. I chose the lovely snowdrop, and titled the quilt Wake-Up Bells. Here's an image of the whole quilt, as well as process images and some detail shots of the finished quilt. As mentioned, it will be on tour for two years, so I took lots of photos before I sent it off.

The size of the quilt is 30 x 30 cm (12" x 12"). It's a wholecloth printed and painted quilt with collage elements between cotton and a layer of silk organza.


First of all I made a preliminary plan of the quilt on watercolour paper to help me make decisions about the colour scheme and texture before I started adding paint to fabric.


I printed cotton with pigment (textile) paint and various handmade and found stamps, transferred the pattern to the cotton with a mechanical pencil and painted the hair with a brush and pigment paint.


I also printed and spray painted silk organza,


and the cotton fabric that I used to soak up the paint that went trough the sheer organza was used for the back of the quilt.


I outlined the image with Derwent Inktense pencils, and started adding the collage elements.


I added the organza over the cotton base fabric, free-motion quilted the whole thing and added hand embroidery as a finishing touch. Here are some close-ups of the finished quilt:


If you're interested in this way of working, I recommend looking up Melanie Testa's book Inspired to Quilt. Melanie works with dye in the book, but it's also possible to use pigment paint, as I have done, if that's more accessible to you.

Thanks for visiting!

19 January 2014

Personalized Sponge Cloths

Just before Christmas I was inspired to work with stencils, and that inspiration has continued after the holidays, partly because I'm teaching stencil techniques at the moment. Today I want to show you a couple of small projects that perhaps could make your household chores a little more fun: personalized sponge cloths. You can buy sponge cloths without print in craft shops.

You've had a sneak peek of the first one already, but as it was a gift for my mum, I didn't want to reveal it completely and spoil the surprise for her. For this first one I've used freezer paper, which I cut into a sort of 'snowflake'. The artist Melanie Testa was the first person to open my mind about the possibilities with freezer paper 'snowflakes' (See e.g. Quilting Arts Magazine issue 21, spring 2006). Paper 'snowflakes' don't have to look like the snowflakes we all cut when we were kids. So I cut a Westie snowflake for my mum. (Regular readers know that I keep referring to Fia the Terri(fi)er. She has an impressive bark, but she really is a very gentle and sweet dog.)

Here you can see the design process: sketch, folds, cut-out, stencil:


And here is the result. As the sponge cloth was quite porous, the paint went under the edges a little bit and made them slightly fuzzy, so I used a Pentel Gel Roller for Fabric to tidy up the edges. I love that pen!


And then I decorated a sponge cloth for myself too, but for this one I didn't use a stencil, only a fabric marker: a Tsukineko Fabrico Dual Marker. A lovely and juicy pen that comes with a bullet tip and a brush tip. A lot has happened with fabric markers since I tried my first one many years ago.


That should add a bit of pizzazz to my kitchen.

Thanks for visiting and see you again soon!

- Annika

12 October 2012

Breast Pockets with Love from Finland

Last week I did my best to promote Melanie Testa's Breast Pocket Project on my blog, in Facebook groups and at the adult education centre where I currently work. I don't know how many of you blog readers joined the project (please leave a comment if you did!), but I got ten pockets from the fabulous women at the adult education cenre, two from my mum, and I made two myself: a total of 14 pockets! So far, that is, because there will probably be one more next week, which will travel to New York bravely on its own. A heartfel Thank You to everyone who joined the project! Here's a photo of the whole ensemble, getting ready for their journey across the Atlantic:


And these are my pockets, with some sort of sashiko embroidery. Melanie is the only "flattie" I know (of), so I made two pockets, as she is a full flattie.


And don't forget that October is breast cancer awareness month, so please give a donation to your local breast cancer reserach organisation. Even a small donation helps!

Have a great weekend, and thanks for popping by! - Annika

5 October 2012

Call for Art: Breast Pockets

(Ni som talar svenska kan skrolla ner en bit, så får ni samma information mera lättillgängligt.)

*****************

My friend and mentor Melanie Testa, whom I've mentioned many times on this blog, as she's had a major influence on my own creative journey, needs your help! Melanie is a breast cancer survior who has chosen against reconstructive surgery or prosthetics, and she wants to turn the repressive body image pressures off for women. Women should be allowed to feel sexy, strong and beautiful whether full, flat or half flat. Melanie wants to raise awareness and acceptance of this alternative, and therefore she has started an art project which involves breast pockets. She needs 1000 pockets before 22 October 2012.

Please, make a breast pocket (use Melanie's pattern, or your own imagination) for every woman you know that has chosen to forego reconstruction, add her name (first name only) to the pocket, and send it to Melanie to show your support. Leave a comment on her blog and she will contact you and give you information about where to send the pocket. If she receives 1000 pockets by 22 October, an ABC News reporter will do a story about the project. I will report back to you on how it went.

Please read Melaines blog post and recent article for more information, and visit her Facebook page.

Thanks! - Annika

*****************

Och eftersom detta är ett så viktigt ämne, så skriver jag samma sak också på svenska denna gång:

Min vän och mentor Melanie Testa, som jag har nämnt många gånger på den här bloggen, eftersom hon har haft ett starkt inflytande på min egen kreativa resa, behöver er hjälp! Melanie har överlevt bröstcancer, men valde att inte rekonstruera sina bröst eller skaffa protes. Hon vill avskaffa den press som läggs på kvinnokroppen om hur den ska se ut. Kvinnor borde få känna sig sexiga, starka och vackra vare sig de har båda brösten i behåll, är delvis platta eller helt platta. Hon vill väcka medvetenhet om och accepterande av detta som ett alternativ, och därför har hon startat ett konstprojekt som handlar om bröstfickor. Hon behöver 1000 bröstfickor före den 22 oktober 2012.

Snälla du, tillverka en bröstficka (använd Melanies mönster, eller din egen fantasi) för varje kvinna du känner som har valt bort rekonstruktion. Sätt hennes namn på fickan (bara förnamnet), och skicka fickan till Melanie för att visa ditt stöd. Lämna en kommentar på hennes blogg så kontaktar hon dig och ger dig information om vart du kan skicka fickan. Du som känner mig kan också ge eller skicka din ficka till mig, så skickar jag alla fickor jag fått in till Melanie om en vecka, dvs. fredagen den 12 oktober. Om hon får ihop 1000 fickor till den 22 oktober så kommer en ABC News-reporter att göra ett reportage om projektet. Jag återkommer senare med rapport om hur det gick.

Läs Melanies blogginlägg och en färsk artikel som hon skrivit så får du mera information om ämnet, och besök hennes Facebook-sida.

Tack! - Annika

*****************

Why not take the opportunity to try something new while making this quick little pocket project? I've wanted to try sashiko and a pocket is the perfect place to practise:

Varför inte pröva något nytt när du gör det här snabba lilla fickprojektet? Jag har velat pröva på sashiko och fickan är ett perfekt ställe att öva:


12 July 2012

It Started with a Stencil

If you follow this blog, you know by now that I recently participated in an online stencil workshop with Melanie Testa (Stencil Magic; there is a rolling admission, so you can still sign up!), during which I made my own stencils. Not a lot of them, but a few I really like. If you want to have a look at photographs of them, as well as descriptions of the inspiration and processes involved, hop over to my Flickr photostream.

I haven't been as active as I wanted to with my stencils, but as I said, I have made some stencils that I really like, and I'm thrilled that the course work has already started to pay off. At the moment I'm working on not one, but three little purses with my own stencilled imagery. I'm basically following Melanie Testa's processes for creating layered textile art, and pattern for a "pretty purse". I'll supply you with a list of sources at the end of this post.

First I took a piece of cotton and monoprinted it, and then I stencilled some nonsense script on it with one of the stencils I'd made. (I masked off part of the cotton with Magic/freezer paper).


Then I took a piece of silk organza and monoprinted that, followed by printing on the organza with my own poppy stencil. It doesn't look like much yet, but wait and see!


I added more printing on the cotton layer, and then I collaged a poppy over the printed cloth. The poppy isn't quite natural from this viewpoint, but it'll be alright in the end.


And this is what the layers look like together. In the background you can see the map I made as a guide.


And here the quilt sandwich is machine quilted, with a few hand embroidered details, and ready for the final steps: to cut out the purse shape, add a zipper and sew it all together.


And, as I said, I have two more purses on the go, so stay tuned. I will show you the finished purses quite soon, I believe. I'm ready to start quilting the other two tomorrow.

If you want to know more about the layering process and the pretty purse, check out these sources (all by Melanie Testa):

General process for creating layered textile art:
Inspired to Quilt

Pretty purses:
Inspired to Quilt
Quilting Arts Magazine issue 36 (December 2008/January 2009) (the link will take you to the digital edition of the magazine)
Quilting Arts TV, episode 304

Thanks for visiting, and please return soon for images of the finished pretty purses. I'm very excited! - Annika

5 July 2012

New Patterns, Part III

I've done a good job of postponing this blog entry, which I originally meant to write about a month ago, when I was participating in an online course in stencilling with Melanie Testa. I wrote the entry New Patterns, which was supposed to start with me telling you that I've quit my job as a translator in order to work as a crafts teacher for a year, and end with some of the new patterns that I'd created in the workshop. Well, as a person who's worked with words and text most of my adult life, I can find it hard to turn off the tap when I get started on a subject, so there wasn't any space for stencilling after I'd finished with my life story. In New Patterns, Part II, I did a warm-up excercise in preparation for the real thing, with stencilled graffiti I'd spotted during my recent trip to Estonia, but... And then there were the Midsummer celebrations... And then my vacation started, and as usual, the first few days of my vacations are usually spent in some kind of stupor. This has become a pattern too, and I consider it quite normal nowadays. After 3-4 days I usually wake up, look around in amazement and get cracking.

As I've mentioned before, Melanie Testa nowadays has a new teaching website, The Clever Guild, where you can take online courses. I took the Stencil Magic workshop, and although I didn't do as much classwork as I wanted to due to a busy schedule and rather overcooked brain, I learned a lot about stencilling.

There is more to stencilling than I ever imagined, and certainly more than one way of using a stencil. Also, there's no right or wrong way. The way you like to use the stencil is the right way, whether it is with fabric paints, artist acrylics, watercolours, pencils, pens, sprays... with the stencil used in a traditional way, or as a template for creating patterns that can be filled in with a brush, or simply as a mask. You can use stencils on cloth and walls, but also in your sketchbook, on your cakes and bread, and why not on a plate before you serve food (in paprika or cocoa powder)! And you don't have to fill in the whole stencil shape either: you can be selective, or fade out or break up the shapes. The last idea is something I still need to explore more. In the page below, made with watercolour paint and pencils, acrylic paint and permanent pen, I've used a commercial stencil (big circles) and a found stencil (sequin waste) to create a painted and discharged background, and then I've stencilled swirls and leaf shapes on top, before glueing a tracing paper bird on top. (I also learned the tracing paper technique from Melanie; e.g. in her latest book Dreaming from the Journal Page, and I'm pretty sure it will be included in her up-coming workshop Dream Journals too. Look at the end of this blog post for more info).


Stencils can be bought, made or found, and every type of stencil has its own place in the scheme of things. A commercial stencil can be the right choice for one thing, whereas a handcut original stencil is unbeatable for other things. Found object stencils (i.e. any flat material with holes in it) are a league of their own, and can create patterns that are difficult to produce in any other way.

Here's a simple stencil that I developed from an interesting water plant and printed on handdyed fabric:


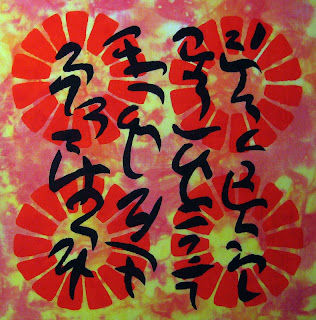
The script-like stencil was developed from brush doodles I made in my sketchbook, and the citrus-like motif was inspired by an opening in a wall:


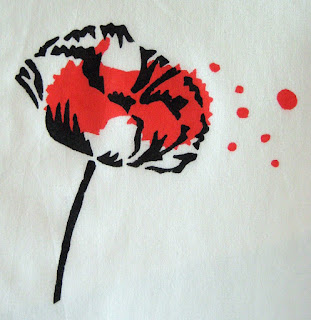
It was an eye-opener for me to realise that stencils can be devoped from a simple line drawing and that they don't have to be extremely simplified or ornamental: in fact they can be pretty organic, if you have the patience to cut them like that! Below is a poppy I developed from a photograph. First I did some sketches in order to get to know the subject (poppies only have four petals; I didn't know that), and then I tried to think of the poppy shape in terms of shadows. That helped me to develop this stencil, which I'm pretty pleased with, if I may say so myself. I also wanted to create stencils that mimic paint splashes, and after some unsuccessful attempts at drawing authentic-looking splashes, it dawned on me to make splashes in my sketchbook, and to use my computer skills to enlarge them to the appropriate size. With a computer, camera/scanner, simple image editing software (or even something like MS Word) and some basic computer skills, you can manipulate your material in a number of ways. I drew the poppy in a small scale, but I'm planning to enlarge it and print it on a t-shirt. The original drawing is just a starting point. It may sound obvious to some of you, but it hasn't been obvious to me. For a long time a drawing was an end-product in my world. It's only quite recently that I've realised that a drawing can be the first step in a line of other exciting things.


Follow the link to my Flickr photostream for more images of my stencils, processes and inspiration.

Hot tip: Melanie's next online class Dream Journals is coming up, with 20 July as the starting date. It's about tips and techniques for keeping a visual journal (diary/sketchbook), and I know it's going to be great. Can't wait for it to start! Check it out on Melanie's blog or The Clever Guild website!

Thanks for visiting, and see you again soon! - Annika

17 June 2012

New Patterns, Part II

Ok, I got lost in my tracks and it took me a while to get back to the second part of my blog entry about new patterns. There's been a lot going on chez Lund, and I've felt like I've been running two steps behind myself for the last couple of weeks. But; I only have two more weeks' worth of  office time now, before not only my summer vacation but also my new life begins. I think I'll start by vegetating for a while, which will include tidying up the chaos in my flat and reorganising my cupboads. I need to dig out all those ringbinders with notes and samples from when I was in teacher training. How exciting!

Now, what I originally wanted to blog about was an online course in stencil making that I've taken with Melanie Testa: Stencil Magic (check out her new teaching website The Clever Guild), but I will have to return to that in New Patterns, Part III, as I really haven't got as far with the course work as I had hoped. Instead, and as a warm-up, I will show you some of the cool graffiti stencil work that I came across on my trip to Tallinn, Estonia, last weekend. Thanks to Melly and her stencil magic, my eyes have opened up to a new art form I never took much notice of before. Aren't these graffiti images fun and inspiring? I should take a walk round Helsinki too, and see if I find some at closer quarters than across the Gulf of Finland. Until New Patterns, Part III, enjoy these Estonian stencil samples:


This funny-bunny popped up in several places


This one's for you Melly!

As well as this one


Does anyone remember these anymore?


This looks pretty yummy, don't you agree?


Thanks for visiting! - Annika

17 May 2012

From Cuffs to Colour

After my second intense dyecation it's been rather quiet in the dyeing department. True, today I did some dyeing, but it was just overdyeing a pair of sun-bleached cargo shorts. Nothing much to blog about there. Last Sunday was Mother's Day, so I spent the weekend with my folks up north. On the train journey there and back I knitted and crocheted a pair of cuffs. I bought a kit with patterns and materials for a scarf, cuffs and a brooch from a local craft shop, Taito shop Helsky. Everything apart from the brooch is finished and ready to wear:


This is what the scarf looked like when I started. It didn't look very promising at that stage, but it turned out fine.


A couple of days ago artist Melanie Testa's new book Dreaming from the Journal Page. Transforming the sketchbook to art lay on my doorstep when I got home from work.


It's been a long and impatient wait, and now I'm eager to immerse myself in her wisdom. I started today by jumping straight into a couple of the colour exercises in the book.

First I did a colour chart of the watercolours in my palette. I use Royal Talens's van Gogh watercolours, for no other reason than that they suited my budget at the time I wanted to invest in watercolours.


The other exercise I did was to grab a pile of magazines and select a colour. I then flicked through the magazines and cut out swatches of that colour in different values and leanings. I didn't analyse too much, just cut out colours that suited my mood and that I felt were related. I was quite surprised by how much colour I found in these magazines. It wasn't difficult at all to fill a page, but perhaps it was because I chose pink. Pink is pretty hot this spring, it seems. We'll see what happens when I do the next colour.

Next, I glued the swatches onto a sketchbook page in an arrangement that was pleasing to me, and then I studied the different values and leanings and tried to mix them with my watercolours. This will be a really useful reference in the future, and I wonder why on earth I haven't done this before. I guess I needed someone to point it out to me.


For a good reason Melanie calls herself 'agent provocateur' on her webpage. She's very generous with her knowledge, and through her blog and video challenges on YouTube she has done much to help me along on my own creative journey. Anyone who wants to learn some really cool things to do with their sketchbook or visual journal, and who wants to learn how to use what they have in their sketchbook as a starting point for textile work should check out Melanie's new book, as well as her first book Inspired to Quilt, which I have mentioned many times before on this blog.

Thanks for visiting, and stay tuned for more of my explorations into colour and cloth. - Annika