Sidor

30 October 2011

Halloween Is Coming...

... the goose is getting fat
Please put a penny in an old man's hat.
If you haven't got a penny,
a ha' penny will do.
If you haven't got a ha' penny,
God bless you.

I learned this rhyme from a young girl while I was living in Scotland. She had a turnip lantern and was dressed up as a witch. She remined me of a similar custom we have in Finland, but at Easter. Halloween isn't a traditional festival in Finland, although we do celebrate All Hallows' Day. However, Halloween has slowly been creeping in among our festivals over the years, and why not? We need a little fun this dreary and dark season. Therefore I decided to embrace Halloween and make myself a pumpkin to cheer things up a little. I found the pattern in Anne-Pia Godske Rasmussen's book Sy liv i lapparna (From 2002, so probably out of print).


Happy Halloween!

24 October 2011

Flora & Fauna

It's time for another quick Franka update. By now I've added the flowers and the fish and started working on the thought bubble.


All those tiny spaces inside the letters... They were a total surprise to me. I hadn't noticed them before I drew the outside of the letters. It's probably just as well I didn't. :D


Behind the thought bubble you can catch a glimpse of another project, which turned out to be a little more ambitious than I expected. That's perfectly normal in my world. I still haven't learned that whenever I think "That shouldn't be too hard" or "That shouldn't take too long", an alarm bell should go off. But it's probably just as well it doesn't. :D

15 October 2011

You Can Tell It's Autumn...

... by the clicking of my knitting needles. In an earlier blog entry, I wrote that knitting is something I regress into when my energy levels are low. I also tend to knit more in the autumn, as the cold weather inspires warm accessories. I found a fun yarn in my stash and figured that a pair of socks would be a useful project for my recent train journeys to and from Ostrobothnia.

Socks in progress. Yarn: Nalle Marjaretki by Novita
This particular yarn is probably no longer available, 
so the closest equivalent would be Nalle Kukkaketo.


Creatively speaking, I haven't been up to much lately, as I've been both tired and away from home. But I have kept myself busy with a few small projects. Two weeks ago, I came up with an idea for a little jewellery pouch, and made 9 in one sitting. (They're really quick to make.) I'm planning to write instructions for them for this blog. They're made from organza, which gives them a luxurious feel, and since the fabric is transparent, you can easily see which piece of jewellery is in which pouch. They're great for necklaces, which easily get tangled up in the jewellery box.


Another project that I've been working on during train journeys and in front of the TV is the pillow cover that I blogged about here. By now I've finished all the embroidery and appliqué...


... and started beading it. I really like the way it is turning out.


And dreaming about my next visit to a warmer climate and the Home of the Boxfish, I've bought a book about snorkelling and free-diving. Inspired by Mrs Eider's and Mrs Merganser's Diving Schools for Ducklings, I've decided to teach myself some simple diving techniques. I'm definitely not planning to learn any advanced free-diving skills, as I'm happy just to be able to pop down under the surface for a few seconds to say hello to my finned friends. So far, however, I've just been practising holding my breath out of the water: on the bus (between bus stops) and walking (between lamp posts). It's quite exciting, and a little bit scary.

My drawing and paiting has been to a near standstill, but I did this doodle recently, inspired by my day-dreaming about diving and snorkelling. I've picked up a few tips along the way about Zen doodling and Zentangle, so I thought I'd give it a try. I've always done pretty boring and unimaginative doodles, so I decided that it's time I shook them up a bit and tried to doodle a bit more creatively. That way it's not just a doodle, but something that I actually might be able to use somewhere. And it's a lot more fun!

2 October 2011

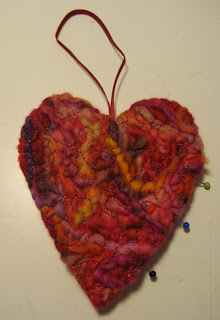
Needle-felted Heart Ornaments

I'm sorry that it took me so long, but here, finally, are the directions for the needle-felted heart ornaments that I wrote about just over a month ago in this blog entry.


Needle-felted heart ornament


Materials:
  • 2 pieces of craft felt, approximately 12 x 12 cm (4.5” x 4.5”) 
  • scraps of yarn, embroidery thread, embroidery floss, etc. 
  • sewing or machine embroidery thread 
  • 1 piece of batting, approximately 10 x 10 cm (4” x 4”) 
  • 22 cm (9”) of narrow ribbon 
  • beads 
  • embroidery floss

Print the template in 150 dpi to ensure that the size is correct

Directions 

1. Arrange the fibres that you wish to needle-punch onto the felt on top of one of the felt pieces. If you use snippets of machine embroidery thread, it is best to place them under the wool, as that makes it easier to secure them.


2. Punch the fibres into the felt with a hand felting tool or a needle-felting machine. You just need to punch them until they stick reasonably well to the surface.


3. Secure the fibres with free-motion stitching or some other form of machine stitching.


4. Trace the heart template on the back of the needle-felted piece, but do not cut it out yet.

5. Place the felt pieces right sides together and stitch along the heart-shaped line, making sure you leave an opening that is approximately 5.5 cm (2 ¼”).

6. Cut around the heart and clip the corners and curves. You can also use pinking shears, in which case you don’t need to clip the curves. Turn the heart right sides out.

7. Trace the heart template onto the piece of batting and cut out the heart shape.

8. Poke the heart shaped piece of batting into the sewn heart through the opening. A tool such as haemostats or tweezers is helpful to get the batting in the right position.

9. Fold the ribbon in half and make a knot close to the raw edges to form a loop. Thread the looped end of the ribbon through a big needle and bring the needle inside the heart through the opening. Poke the needle through the fabric in the indentation on top of the heart and pull the ribbon through. The knot is now hidden inside the heart.


10. Whip stitch the opening closed.

11. Finish the heart with beaded blanket stitch, which is worked like this: take a stitch, thread a bead onto the embroidery floss and push it as far as it goes, take a new stitch, making sure that the bead sits on the loop that forms along the top edge of the stitch.


The finished needle-felted heart ornament


Good luck with your heart ornament!   


PS. Please let me know if you find errors in the directions so I can correct them!