25 July 2012

Bloomers Bucket Hat

I'm out and about a lot right now, but in between errands, excursions and assignments I've managed to finish my bucket hat. I showed you the stencilled hat pieces earlier in this post. For decorating the hat, I used the reverse appliqué technique and added a simple beaded border along the edge.


I haven't yet started on the fitted top (follow the link above for an image of the printed fabric), but I believe it's coming up.

Thanks for visiting! More soon! - Annika

22 July 2012

A New Flatmate

I have a new flatmate! Her name is Donna (ok, the name tag says Diana, but she's definitely a Donna to me) and she moved in with me only a few days ago. And the best thing is that we're the same size, so she's going to help me out with dressmaking. Isn't that a great pal to have around?

Here she is:


And below she is posing with the moth wings shrug that I've mentioned earlier in this post (,where I also posted a link to the pattern, should anyone be interested). A month ago the shrug was only an anonymous rectangle of crocheted squares, and now it's all finished:

Front


Back

Speaking of moths, I saw a new and interesting moth/butterfly the other day. Look at the patterning on the wings! Isn't that a beautiful border pattern? I might have to borrow it for something.


Thanks for visiting and see you again soon! - Annika


18 July 2012

More Stencilling!

There are certain names that I regularly return to in this blog. One of them is Melanie Testa, as you know if you've read my blog lately. Another name is Natalie Chanin of Alabama Chanin.

As soon as I finished my pretty purses I turned to another couple of projects that have been on my to-do list for a while. A couple of years ago I made myself a bandana according to the instructions in Chanin's book Alabama Stitch Book, but I've wanted to make myself a proper garment too. While I've been biding my time and soaking up knowledge, I've bought all three of her books, and have a whole Alabama Chanin library by now. I love all her books, and in the last one you get full-sized patterns for an Alabama Chanin wardrobe, along with instuctions, tips and inspiration. So the time is ripe to get started. I've also found it hard to just sit and watch while my friend Cheryl Razmus is whipping up garment after garment. Have a look at her gorgeous creations on Flickr.

I decided to start small and make a simple bucket hat and fitted top to try out the patterns before I embark on anything more complicated and time-consuming. So I dug out the good old 'Bloomers' stencil I used before for my bandana, and used it to print on the fabric for the hat


and for spray painting on the fabric for the fitted top.


The spray painting technique is what Chanin calls 'faded leaves' and the effect is created by spraying thinned paint onto wet fabric for a watercolour look. My paint didn't run as much as I expected, probably because the paint wasn't thin enough, or the fabric wet enough, but I'm pretty pleased anyway. I'll go for a runnier look next time. The main thing now is that I get an interesting fabric for trying out the pattern. I want to be sure of the fit before I invest all that effort into a more elaborate garment.

I'd just got rid of old, flaking nail polish when I got this new manicure. Oh well.


I didn't want to waste the paint that collected on top of the stencil so I flipped the stencil onto a piece of cotton and got this interesting texture.


I'm really exited about a new discovery I've made in the field of textile paint. Well, to be honest, I've known about these products for a long time, I just wasn't ready for them before now. I've mentioned the Finnish brand Emo Tuotanto's fibre reactive dyes before on this blog, but now I've also tried their mediums for printing on fabric. They have a thicker medium that is used for printing and a runnier medium that can be used for sun printing or spraying. The great thing about these mediums is that they come clear and you add the pigment yourself. So you can mix any colour you like in any consistency. I love it! Why haven't I used them before? (They also carry ready-mixed paints, which I have used until now.)

Liquid medium and print paste, along with liquid pigments to add to the mediums.


I realise that it might be difficult for my international readers to get hold of these products, but perhaps your own national brand carries something similar? Have a look around next time you are looking for textile paint! It's great fun to have the freedom to mix your own colours.

Thanks for visiting! To be continued... - Annika

17 July 2012

Good Things Come in Threes

Here they finally are, my little pretty purses! And I'm pretty pleased with them, if I may say so myself.


Let me give you a couple of hot tips. There are two things that helped me accomplish three purses in a relatively short space of time. I designed these purses with a particular purpose in mind, you see, and I had little time to fuff about. I needed to be efficient.

As regular followers know, these purses are inspired by and based on the techniques Melanie Testa presents in her book Inspired to Quilt (please refer back to this post for more info). In the book Melanie uses thickened Procion MX dyes to design her fabrics. However, I felt I wanted to do things quick and dirty this time, without having to soda soak or batch fabric. So I used fabric paints. Fabric paints work very well for monoprinting, as long as you keep in mind that you are dealing with a medium that dries fairly quickly. Have a plan before you spread the paint on the printing plate, otherwise you will discover that most of the paint got stuck to the plate instead of the fabric. Fabric paint gives the fabric a slightly plastic feel, but with monoprinting it isn't as bad as I expected, as the layer of paint is very thin. What I appreciated most was that the paint dried quickly, so there was hardly any waiting time at all. I was surprised by and pleased with the result, and I have come to appreciate fabric paints more after this experience.

My second hot tip is to work in a series. I'm not particularly keen on doing the same thing over and over again, I get bored too easily, but working in a series definitely helps you to produce more art, as you don't have to "reinvent the wheel" with every new piece. You learn things with each piece, and can apply your insights immediately in the next piece, so there is educational value in it as well. And when the motif is fixed, as it is in this case, I was able to concentrate on other things, such as colour and pattern. I'm not planning to always work in a series from now on, but I've realised that it is definitely something worth considering every now and then.

Here are a couple of detail shots (I love the way the monoprint makes the bud look hairy - that was serendipity):


As these are purses, I wanted the insides to be just as neat as the outsides, so I used embroidery thread also in the bobbin. That also helped me to get rid of any problems with thread tension and unwanted bobbin thread creeping up to the front.


I also bound the edges on the inside and added my own tag.

The tag is made from a piece of cotton ribbon with an inkjet iron-on transfer print.

And that's my pretty purses! I had a lot of fun with these.

Thanks for visiting and see you again soon! - Annika

16 July 2012

Two More Pretty Purses

By now I've quilted all three pretty purses (please refer to this blog entry for more information about pretty purses, and images of the first purse I quilted), and I'm off to buy zippers. Before I dash off, however, I'll share process photos of the other two purses.

Pretty purse nr 2:

Printed cotton and silk organza 
The two layers aligned
and quilted

 Pretty purse nr 3:

Printed cotton and silk organza
 The two layers aligned
and quilted

Thanks for visiting! I hope to have images of the finished purses soon. - Annika

12 July 2012

It Started with a Stencil

If you follow this blog, you know by now that I recently participated in an online stencil workshop with Melanie Testa (Stencil Magic; there is a rolling admission, so you can still sign up!), during which I made my own stencils. Not a lot of them, but a few I really like. If you want to have a look at photographs of them, as well as descriptions of the inspiration and processes involved, hop over to my Flickr photostream.

I haven't been as active as I wanted to with my stencils, but as I said, I have made some stencils that I really like, and I'm thrilled that the course work has already started to pay off. At the moment I'm working on not one, but three little purses with my own stencilled imagery. I'm basically following Melanie Testa's processes for creating layered textile art, and pattern for a "pretty purse". I'll supply you with a list of sources at the end of this post.

First I took a piece of cotton and monoprinted it, and then I stencilled some nonsense script on it with one of the stencils I'd made. (I masked off part of the cotton with Magic/freezer paper).


Then I took a piece of silk organza and monoprinted that, followed by printing on the organza with my own poppy stencil. It doesn't look like much yet, but wait and see!


I added more printing on the cotton layer, and then I collaged a poppy over the printed cloth. The poppy isn't quite natural from this viewpoint, but it'll be alright in the end.


And this is what the layers look like together. In the background you can see the map I made as a guide.


And here the quilt sandwich is machine quilted, with a few hand embroidered details, and ready for the final steps: to cut out the purse shape, add a zipper and sew it all together.


And, as I said, I have two more purses on the go, so stay tuned. I will show you the finished purses quite soon, I believe. I'm ready to start quilting the other two tomorrow.

If you want to know more about the layering process and the pretty purse, check out these sources (all by Melanie Testa):

General process for creating layered textile art:
Inspired to Quilt

Pretty purses:
Inspired to Quilt
Quilting Arts Magazine issue 36 (December 2008/January 2009) (the link will take you to the digital edition of the magazine)
Quilting Arts TV, episode 304

Thanks for visiting, and please return soon for images of the finished pretty purses. I'm very excited! - Annika

6 July 2012

A Splash of Colour

for your inspiration and mine!

After a slow start, summer has finally decided to make an appearance in this northern place, and I've been enjoying the sun out on the balcony. A couple of days ago I planted some lovely flowers to get the creative juices a-flowing. Pink is hot this summer, I can tell you.

Here's my tiny "flower garden":


They look like some sort of geranium, and I love them!


And here's the "herb garden":


My favourite happy rug:


Aren't these lichens beautiful? They grow on the parapet (scroll up to the first image and you'll see them peeping behind the flowers). I guess a sensible person would scrub them off, but I can't. They're so pretty. Look at the frilly bits and little cups! They're staying right where they are as long as I'm in charge.


These are a few of my favourite things at the moment, and I hope they got your creative juices a-flowing too! -Annika

5 July 2012

New Patterns, Part III

I've done a good job of postponing this blog entry, which I originally meant to write about a month ago, when I was participating in an online course in stencilling with Melanie Testa. I wrote the entry New Patterns, which was supposed to start with me telling you that I've quit my job as a translator in order to work as a crafts teacher for a year, and end with some of the new patterns that I'd created in the workshop. Well, as a person who's worked with words and text most of my adult life, I can find it hard to turn off the tap when I get started on a subject, so there wasn't any space for stencilling after I'd finished with my life story. In New Patterns, Part II, I did a warm-up excercise in preparation for the real thing, with stencilled graffiti I'd spotted during my recent trip to Estonia, but... And then there were the Midsummer celebrations... And then my vacation started, and as usual, the first few days of my vacations are usually spent in some kind of stupor. This has become a pattern too, and I consider it quite normal nowadays. After 3-4 days I usually wake up, look around in amazement and get cracking.

As I've mentioned before, Melanie Testa nowadays has a new teaching website, The Clever Guild, where you can take online courses. I took the Stencil Magic workshop, and although I didn't do as much classwork as I wanted to due to a busy schedule and rather overcooked brain, I learned a lot about stencilling.

There is more to stencilling than I ever imagined, and certainly more than one way of using a stencil. Also, there's no right or wrong way. The way you like to use the stencil is the right way, whether it is with fabric paints, artist acrylics, watercolours, pencils, pens, sprays... with the stencil used in a traditional way, or as a template for creating patterns that can be filled in with a brush, or simply as a mask. You can use stencils on cloth and walls, but also in your sketchbook, on your cakes and bread, and why not on a plate before you serve food (in paprika or cocoa powder)! And you don't have to fill in the whole stencil shape either: you can be selective, or fade out or break up the shapes. The last idea is something I still need to explore more. In the page below, made with watercolour paint and pencils, acrylic paint and permanent pen, I've used a commercial stencil (big circles) and a found stencil (sequin waste) to create a painted and discharged background, and then I've stencilled swirls and leaf shapes on top, before glueing a tracing paper bird on top. (I also learned the tracing paper technique from Melanie; e.g. in her latest book Dreaming from the Journal Page, and I'm pretty sure it will be included in her up-coming workshop Dream Journals too. Look at the end of this blog post for more info).


Stencils can be bought, made or found, and every type of stencil has its own place in the scheme of things. A commercial stencil can be the right choice for one thing, whereas a handcut original stencil is unbeatable for other things. Found object stencils (i.e. any flat material with holes in it) are a league of their own, and can create patterns that are difficult to produce in any other way.

Here's a simple stencil that I developed from an interesting water plant and printed on handdyed fabric:


The script-like stencil was developed from brush doodles I made in my sketchbook, and the citrus-like motif was inspired by an opening in a wall:
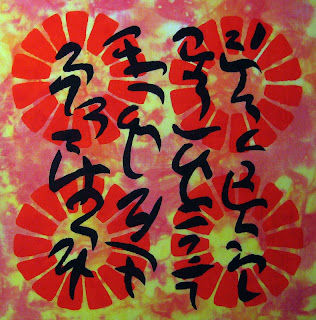

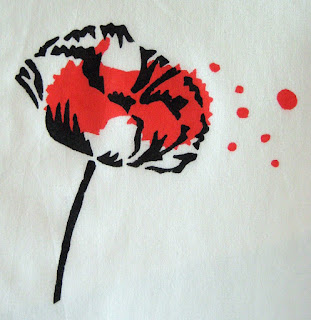
It was an eye-opener for me to realise that stencils can be devoped from a simple line drawing and that they don't have to be extremely simplified or ornamental: in fact they can be pretty organic, if you have the patience to cut them like that! Below is a poppy I developed from a photograph. First I did some sketches in order to get to know the subject (poppies only have four petals; I didn't know that), and then I tried to think of the poppy shape in terms of shadows. That helped me to develop this stencil, which I'm pretty pleased with, if I may say so myself. I also wanted to create stencils that mimic paint splashes, and after some unsuccessful attempts at drawing authentic-looking splashes, it dawned on me to make splashes in my sketchbook, and to use my computer skills to enlarge them to the appropriate size. With a computer, camera/scanner, simple image editing software (or even something like MS Word) and some basic computer skills, you can manipulate your material in a number of ways. I drew the poppy in a small scale, but I'm planning to enlarge it and print it on a t-shirt. The original drawing is just a starting point. It may sound obvious to some of you, but it hasn't been obvious to me. For a long time a drawing was an end-product in my world. It's only quite recently that I've realised that a drawing can be the first step in a line of other exciting things.

Follow the link to my Flickr photostream for more images of my stencils, processes and inspiration.

Hot tip: Melanie's next online class Dream Journals is coming up, with 20 July as the starting date. It's about tips and techniques for keeping a visual journal (diary/sketchbook), and I know it's going to be great. Can't wait for it to start! Check it out on Melanie's blog or The Clever Guild website!

Thanks for visiting, and see you again soon! - Annika