9 October 2019

The Heart Nebula – Deep-sky Object ALC 2

The Heart Nebula
34 x 34 cm (13,5" x 13,5")


This quilt is the second in a series of astroquilts that I’ve got planned. The first quilt in the series is titled Cosmos and you can read about the process behind it on this blog (Cosmos Part 1, 2, 3 and 4) and in the Autumn 2019 issue of Art Quilting Studio magazine.

Cosmos, detail


This second astroquilt was inspired by a nebula called the Heart Nebula (IC 1805), which is located about 7 500 light years from where we are. The shape of this interstellar dust cloud resembles the heart symbol, and that’s how it got its name. It was in fact the name that caught my attention, but not as the romantic heart-shape it was named after. Instead, I was interested in the anatomical, blood-pumping, tough muscle that keeps us all going.

The human heart is a complicated old thing


A nebula is an interstellar cloud of dust and gas. When a cloud like that is dense enough the pressure may become so great that the cloud starts to contract and it becomes a stellar nursery: a place where new stars are formed. I wanted to make a Heart Nebula quilt where the pressure inside the contracting heart muscle is so great that stars are forming and the heart begins to pump out stars.


The mathematical symbols in the background represent ”Jeans mass”:  the critical point when a nebula starts to contract and form stars. I’ve also included a representation of the sinus rhythm: the rhythm of the heart starts at the sinus node, which has the ability to spontaneously and continuously produce electrical impulses that cause the heart to contract.


If you want to follow the process behind this quilt step by step, please visit my project page or check out my Instagram feed.

Thanks for visiting my blog!

1 September 2019

From Deep Sea to Deep Space

For quite some time, I’ve been thinking about making a series of art quilts that form a cohesive whole. The problem was that I couldn’t make my mind up what the theme should be. I’ve felt strongly that I want to do something with mermaids and the ocean, but for some reason my ideas felt superficial and childish, lacking depth. I love mermaids and sea creatures, I love swimming, I care about the state of our oceans and lakes, but it didn’t seem to be enough to push me into creative mode.  I didn’t want to make just pretty stuff: I wanted heart and soul. But not politics. I made a mermaid doll, I made a small mermaid art quilt, but it stopped there and my creator’s block continued.


At this point I came across an astronomy course, A Galactic overview, and decided to sign up. Since I was a child I’ve had some interest in space and the starry sky, but because most of my adult life I’ve lived in places where you couldn’t easily see stars and my life has been filled with plenty of other interests, I haven’t really devoted much time to space-related matters. Therefore it came as a surprise to me that this brief course led to a veritable explosion of creative ideas, and a new imaginary world where strange concepts were born: I painted comet ladies, astromaids, moon ladies and Celtic knotwork galaxies. I started painting nebulae on fabric and making purses and garments with a space theme. I took an interest in astrophotography, and took funny selfies with the full moon. I read books about astronomy and gained new knowledge. And in time an idea began to form in my head, which eventually led to my first space-themed astroquilt, Cosmos.

For me, the work on an art quilt brings the deepest satisfaction if it is a journey of learning. Dyeing fabric and sewing isn’t enough. I want more. I want challenge and development. I want to learn new skills and gain new knowledge. And I love to mix concepts, play with words and symbolism and create new meaning and alternative realities. Astronomy turned out to be a deep well to scoop from, and my head is swimming with ideas.


So I’ve decided to start working on a space-themed series of art quilts and mixed media artwork, and as a working title I’ve chosen to call the project ‘From Deep Sea to Deep Space’. The space theme will run through the whole project as the connecting idea, but I also want to introduce other concepts. I want space and the ocean to intermingle and the boundaries between them to blur. I want mermaids and astromaids to play in this environment. I want starfish and star-shaped fossils to twinkle in the deep. I want to explore the universe deep inside the human body.


To spur me on, I’ve set a date for an exhibition in September 2020, and I’ve created a special Facebook page for the project, which will bring together everything I publish on different social media platforms.

Would you like to follow me on this adventure?


30 March 2019

Cosmos, Part 4

Welcome back to the fourth and final part of the story behind Cosmos! For me, the last stage of making an art quilt usually involves hand stitching, and that is what this blog post is all about.

The road that led me to work this way started with free-motion machine embroidery, which led to free-motion machine quilting, but it was not until I realised that I could combine machine and hand stitching that things fell into place and I felt I’d found my place in the world of art quilting. I feel that hand stitching is a wonderful complement to machine work, and above all it brings life and depth to a surface in a way that machine stitching can’t mimic. It is slow work, yes, but satisfying on so many levels.

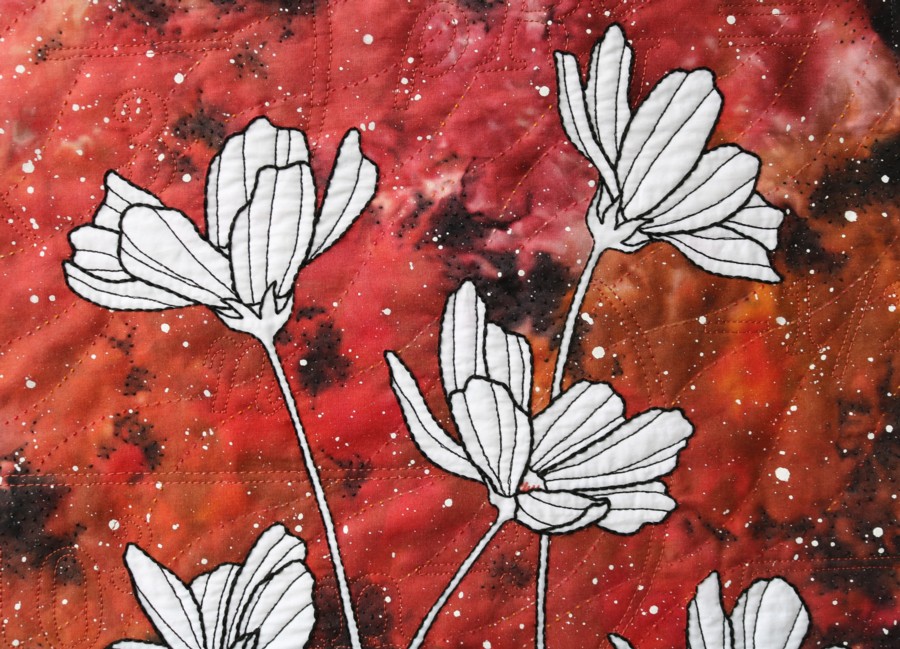
So after I’d finished all the machine work, it was time to hand stitch the flowers. I’d already tried out my stitches on a sample so the outlines were pretty straightforward: 5 strands of embroidery floss for the flower heads and 3 strands for the stems. I really enjoyed stitching the flower heads and I made good progress.

See me hand stitch a flower on Instagram


When it was time to do the stems I hit a wall, though. It was mind-numbingly tedious to stitch seemingly endless straight lines and I had to figure out rewards for myself to keep going.


The long-term reward was the thought that as soon as I’d finished the stems I would be allowed to use the threads I’d dyed for the background.


The instant reward was that I allowed myself a break to think about the middle of the flowers. I did one flower, but wasn’t happy with how it looked, so I printed a number of flowers on paper, drew different versions of how the stitching could be done and auditioned them on the quilt.

See me audition the flowers on Instagram

This helped me decide how to deal with the flowers. The bottom version is the one I chose.


I can sometimes be extremely finicky with details, and in the following case I didn’t like the angle of the stitches on the flower to the left. So I unpicked them and tried slanting them the other way. The difference is subtle, but the one to the right feels right to me.


When the flowers were finished it was time to think about the hand stitching in the background. By now I’d realised that I was going to do a lot more hand stitching than what I’d originally planned. Partly because there was a bit too much unquilted surface after the machine quilting was finished, and partly because I’d come up with an idea that I was really excited about: I was going to stitch tiny seed stitches with black on black that would represent ‘dark matter’. It is believed that 95% of the universe consists of dark matter and dark energy. It is called ‘dark’ because no one really knows what it is - yet. I wanted the dark matter on the quilt to be almost invisible too, so that you could only spot it when it caught the light, or if you touched the quilt.


Dark matter is more easily spotted if you sneak up on it from behind


As I said, I was really excited about the idea of dark matter, but it was hard going. It was even more tedious than the flower stems and pretty hard on my eyes and neck. And of course, when you work on something like this and reflect on the fact that you spend so much time working on something that will hardly even be noticed, you start questioning your own sanity, and why on earth you do certain things… So I took another break and worked on what I called ‘background radiation’, where I could use more cheerful colours and the stitching was easier. Head over to this post on Instagram if you want to know more about cosmic background radiation, but in just a few words, it is leftover radiation from the Big Bang. I wanted to depict it as lazy wavelengths that went diagonally over the nebula in the background.


When the background radiation was finished there was nothing else to do but to roll up my sleeves and finish the dark matter. By now I’d had time to think about my situation, and one thing that I’d come to realise was that the reason why I love to work with textiles, even though it’s so much slower than if I’d paint the same motif on canvas, is the tactile nature of fabric and fibre. It feels good in my hands. I mentioned my eyes earlier, and being a visual person the thought that I may lose my eyesight one day pretty much freaks me out. Working with the dark matter, though, suddenly brought a sense of comfort. Hand stitching on fabric can be like braille, and if there comes a day when I can no longer see what I stitch, I can feel it instead.


And just like that the last particle of dark matter was in place and all that was left was to square the quilt and finish the edges. When I make art quilts I like clean edges and therefore I usually finish them with facing strips. And, of course, I wanted the facing to complement the quilt, so I spattered white paint on black fabric for stars before I cut the strips.


Finally, I attached a hanging sleeve, and I will soon design a label with the title and date as the final detail.

So that was it. It’s been a long journey and I will have a short break before I get started with the next quilt. But I already have plans, and those who follow me on Instagram and Facebook will know that the theme for my next art quilt will be ‘Black Hole’. I’m very excited to find out where that will take me.


Thank you so much for following my journey! I’m not sure when I will write the next blog post, but I will continue to post regular updates on Instagram and Facebook, so I hope to see you there!

All the best,

23 March 2019

Cosmos, Part 3

Welcome back to Part 3 of the story behind Cosmos! Today I’m going to tell you about the machine quilting part of the process.

After I’d assembled the quilt top it was time to consider how I was going to quilt the piece. There was not a straightforward answer, and I decided to let the question about the background simmer while I concentrated on the flowers. I knew I wanted both thick and thin lines in the flowers, because that’s how I like it when I draw with ink on paper, and the question was whether to use only machine stitching (the quicker way) or to use a combination of machine and hand stitching (the slooower way). So I stitched up a couple of samples to help me decide.


It soon became clear that I preferred a combination of machine and hand stitching. Firstly, because it would take many rounds of machine stitching to achieve the contrast between thick and thin lines that I wanted, which would introduce a risk of puckering. Secondly, because hand stitching brings life into a surface in a way that machine stitching can’t mimic. So I prepared myself for a long-haul.


Even though I was going to hand stitch the stems, I also machine stitched them to stabilise the layers before the handwork. And since the stems were intertwined, there were a lot of starts and stops that couldn’t be avoided. I usually prefer to tie off thread ends and bury the knots inside the quilt, because it looks neater, so there were a lot of thread ends to deal with. In hindsight, though, it would have been wiser to just stitch a few tight anchoring stitches and cut the thread ends, as the anchor points would have been hidden by the hand stitching later. It’s all a learning process.


When the machine stitching on the flowers was finished it was time to get serious about the background.

The thing about quilting the background that had me scratching my head was the stars that were scattered all over the fabric. I didn’t want an overall filling pattern with stitches that would go across the stars. So I needed to come up with something else. Also, I wanted something meaningful that complemented the theme of the quilt. So I thought why not use mathematical symbols or equations for the quilting? I went to the library and got out a book about astronomy and started looking for the right thing. And this ‘thing’ turned out to be Jeans mass.


A nebula is an immense cloud of dust and gas in space, and there is a critical point at which the external pressure on the cloud becomes too high and the cloud collapses, starts to contract and form new stars: Jeans mass or Jeans instability (named after the astronomer James Jeans) describes this state. This was perfect. There were different formulae to choose from and I picked out a few that I felt would work for the quilting.


Again (no surprise here...), it was quite tricky to find a composition that was both practical and pleasing without taking too many creative liberties with the equations. It would have been easier if everything had been set up in neat little rows and not jumping up and down so much. But that’s life in a nutshell, isn’t it?


To help me quilt the equations I used the method of stitching through tissue paper, which is excellent for complicated imagery. With tissue paper you don’t need to transfer any markings to the fabric and the stitching is clean and neat when you remove the paper.


Before you remove the paper, though, you need to secure all your thread ends to protect the stitches. I like to bring all the thread ends to the back of the quilt, tie them and bury the knot inside the quilt.


Did you hear me sigh? This is not my favourite part...

And after an insane amount of stitching and tying off thread ends, the machine quilting was finally finished!


That was all for Part 3. The next and final part will deal with the hand stitching. I hope to see you again then!


15 March 2019

Cosmos, Part 2

Welcome back to Part 2 of the story behind Cosmos! Today I’m going to talk about how I designed the flower motif and master pattern for the applique, and how I assembled the quilt top.

The cosmos flowers on my balcony were of the species chocolate cosmos, and although I adored the colour and scent (they do smell of chocolate!), I soon realised that what I was really after in my design was the more common species with bigger petals.


So I returned once more to cosmology – the study of cosmos.


When I had drawn enough flower heads to choose from I scanned my favourites and played with the size until I hit the right proportions. To help me with that, I printed, cut out and shuffled around the flowers on the fabric I’d created until I was happy with how it looked.


The arrangement of the flower heads may sound simple enough, but bear in mind that I also needed to take the, as yet, unexisting flower stems into account. The tilt of the flower heads had direct consequences for the direction of the stems. In fact, finding a pleasing composition for the stems proved to be a lot trickier than I had thought. I made good use of my eraser.


When I was happy with the rhythm of the stems it was time to refine the drawing and to ink it. After that I had my master pattern and was ready to start with the applique.


I like to work with fused applique, and in this quilt I wanted white flowers on a dark background. I knew from the start that the best solution for this design would be to use reversed applique, i.e. to fuse the dark background onto a white fabric instead of white flowers onto a dark background. That way the white would stay pure as there would not be a dark fabric underneath it. Also, it would have been quite difficult to cut out and manoeuvre the long, thin and entangled stems without fraying the edges. The background applique pieces would be easier to handle. So I drew the design onto paper-backed fusible web and ironed it to the back of the background fabric. And then I started cutting up my beloved nebula fabric…


To keep track of all the pieces I used masking tape to attach them to the master pattern.


When all the pieces were cut out, it was time to arrange them on the white fabric and to use an iron to fuse everything into place.

Finally, I transferred the lines in the flower heads onto the white fabric with a permanent pen. I was now ready to start sewing.


And that is all for now. Next time I will continue the story with the machine quilting phase. Thank you for visiting and I hope see you again!