24 June 2012

Midsummer

Midsummer is here again, and in this part of the world that means that the sun is up more or less all night. It's fair to say that it's the second largest festival in Finland after Christmas, and people celebrate it for good reason. We spend so much time cooped up in darkness that it's no wonder this is such a big deal to us. This year we've been incredibly lucky with the weather: the sun has been shining almost non-stop and it's been nice and warm. Here you can see my dad hoisting the flag. The night between Midsummer Eve and Midsummer Day is the only time of the year when the rule says you can fly the flag all night.


Fia the Terri(fi)er enjoys the weather, as well as rolling around in the grass.


These sheep looked pretty happy too, but ran away when I tried to get a little bit nearer


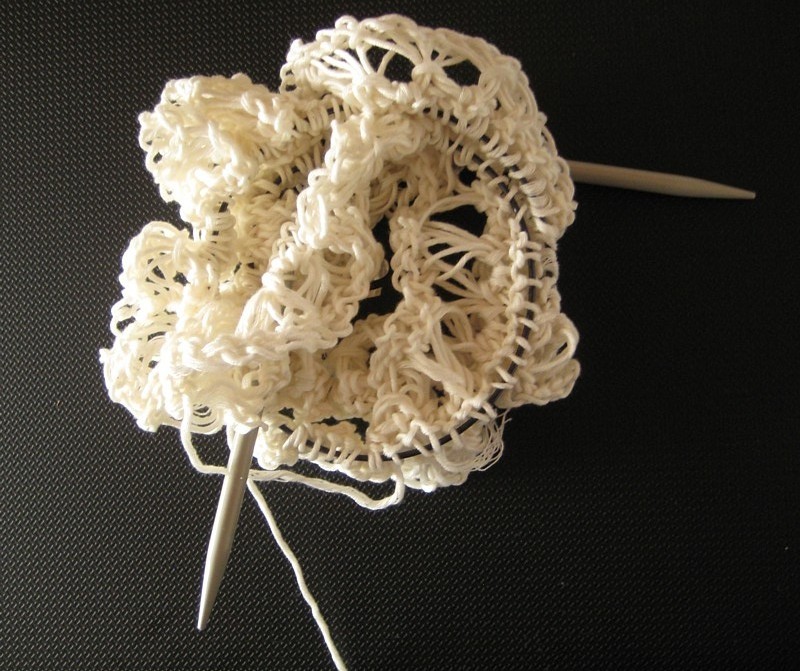
My Midsummer project this year is this cute crocheted moth wings shrug (follow the link for an image of the whole shrug). It's portable and very easy to work with on the train as well as out on the sun-deck behind the house. I've finished the back piece and started with the front halves. I've made great progress on it this weekend.


It took me ages to get started, though, because I just couldn't figure out the gauge (Sw. masktäthet). It seemed to me that the recommended yarn was way too thin for the recommended hook. So I first did some research about possible errors in the pattern, but didn't find what I was looking for. I then made a sample with the recommended hook and yarn, and discovered that the way I crochet, the sample became way too small. I tried substituting the yarn, and got the right gauge, but then the fabric became too thick and stocky. So I finally ended up using the right yarn, but a hook that is two numbers bigger than what is recommended in the pattern (2.5 mm according to the pattern, but I use a 3.5 mm needle for a yarn which is designed for a 0.75 mm needle). It took me a while to get used to the combination of thin yarn and big hook, but I got there in the end. And I guess the point is that with bigger loops, you get a much softer fabric. It makes sense when you think about it, but it felt pretty strange to me at first.

It's been a really relaxing weekend with sunshine, fresh air, good food, good company, a good craft project, exercise, sauna, flowers in plenty and birdsong in the air. I don't think I've ever seen so much cow parsley (Sw. hundkäx) in bloom before. Here, they're mixed in with lupins.


Some of mum's flowers, with the house in the background.


Thanks for visiting! There's only one more week of office time for me now, and then my vacation and new life starts (pleaser refer to this blog entry if you haven't heard about my adventures next year)! I will keep you posted! - Annika

17 June 2012

New Patterns, Part II

Ok, I got lost in my tracks and it took me a while to get back to the second part of my blog entry about new patterns. There's been a lot going on chez Lund, and I've felt like I've been running two steps behind myself for the last couple of weeks. But; I only have two more weeks' worth of  office time now, before not only my summer vacation but also my new life begins. I think I'll start by vegetating for a while, which will include tidying up the chaos in my flat and reorganising my cupboads. I need to dig out all those ringbinders with notes and samples from when I was in teacher training. How exciting!

Now, what I originally wanted to blog about was an online course in stencil making that I've taken with Melanie Testa: Stencil Magic (check out her new teaching website The Clever Guild), but I will have to return to that in New Patterns, Part III, as I really haven't got as far with the course work as I had hoped. Instead, and as a warm-up, I will show you some of the cool graffiti stencil work that I came across on my trip to Tallinn, Estonia, last weekend. Thanks to Melly and her stencil magic, my eyes have opened up to a new art form I never took much notice of before. Aren't these graffiti images fun and inspiring? I should take a walk round Helsinki too, and see if I find some at closer quarters than across the Gulf of Finland. Until New Patterns, Part III, enjoy these Estonian stencil samples:


This funny-bunny popped up in several places


This one's for you Melly!

As well as this one


Does anyone remember these anymore?


This looks pretty yummy, don't you agree?


Thanks for visiting! - Annika

4 June 2012

New Patterns

I'm sorry that I've been away from this blog for some time. In one sense, not much has been going on to blog about. In another sense, everything has happened, and now I feel I'm ready to blog about it. Things are on the move. The patterns of my life are changing.

Everything is possible!


For the last seven and a half years I've been working full time as a legislative translator, but this spring I decided to take a break and do something completely different. Get out of the rut, gain a new perspective, try my wings, find my passion. A chance came my way and I grabbed it with both hands, and I'm on my way. A couple of weeks ago I handed in my resignation. I quit my job. And I'm swinging between ecstacy and panic. It's thrilling and terrifying. Writing this makes my heart race and my arms shake.

In an earlier life (i.e. before my career as a translator) I trained as a crafts teacher (I won't even try to explain the many a-winding turns of my life), but when I moved to Helsinki I left that career behind me, apart for when I occasionally held a short weekend class at an educational institution for adults that we have in Finland, called the workers' institute in direct translation ('arbetarinstitut' in Swedish and 'työväenopisto' in Finnish). It's basically open for anyone over 16, and for a relatively small fee you can attend classes in anything from ICT and navigation and languages to cookery and crafts and sports.

So, the incredible chance that popped up this spring is that I was offered to teach four craft classes for adults at one of the workers' institutes we have in Helsinki, plus two craft classes for children, for the autum and spring terms 2012-2013. The adult classes will deal with dyeing & printing, hand & machine embroidery, simple clothesmaking skills and surface textures in textiles. The classes for children will be a mix of different crafts such as e.g. papier maché, crochet, embroidery and fabric printing.

I won't pretend that it isn't pretty darn scary to leave a relatively safe and well-paid job and just throw myself into the unknown, but I feel I owe it to myself to give it a chance. They all say that it's not the things you do that you regret, but the things you didn't do. So I'll just do it. And next year I'll be wiser.

This song is my anthem. Follow the link and listen carefully to what she says: Madonna: Jump

I was going to write more about patterns, but I think I've said more than enough for one blog post. Many thanks for reading this far, and please return for Patterns Part 2, which will be more about crafts and less about me. - Annika

17 May 2012

From Cuffs to Colour

After my second intense dyecation it's been rather quiet in the dyeing department. True, today I did some dyeing, but it was just overdyeing a pair of sun-bleached cargo shorts. Nothing much to blog about there. Last Sunday was Mother's Day, so I spent the weekend with my folks up north. On the train journey there and back I knitted and crocheted a pair of cuffs. I bought a kit with patterns and materials for a scarf, cuffs and a brooch from a local craft shop, Taito shop Helsky. Everything apart from the brooch is finished and ready to wear:


This is what the scarf looked like when I started. It didn't look very promising at that stage, but it turned out fine.


A couple of days ago artist Melanie Testa's new book Dreaming from the Journal Page. Transforming the sketchbook to art lay on my doorstep when I got home from work.


It's been a long and impatient wait, and now I'm eager to immerse myself in her wisdom. I started today by jumping straight into a couple of the colour exercises in the book.

First I did a colour chart of the watercolours in my palette. I use Royal Talens's van Gogh watercolours, for no other reason than that they suited my budget at the time I wanted to invest in watercolours.


The other exercise I did was to grab a pile of magazines and select a colour. I then flicked through the magazines and cut out swatches of that colour in different values and leanings. I didn't analyse too much, just cut out colours that suited my mood and that I felt were related. I was quite surprised by how much colour I found in these magazines. It wasn't difficult at all to fill a page, but perhaps it was because I chose pink. Pink is pretty hot this spring, it seems. We'll see what happens when I do the next colour.

Next, I glued the swatches onto a sketchbook page in an arrangement that was pleasing to me, and then I studied the different values and leanings and tried to mix them with my watercolours. This will be a really useful reference in the future, and I wonder why on earth I haven't done this before. I guess I needed someone to point it out to me.


For a good reason Melanie calls herself 'agent provocateur' on her webpage. She's very generous with her knowledge, and through her blog and video challenges on YouTube she has done much to help me along on my own creative journey. Anyone who wants to learn some really cool things to do with their sketchbook or visual journal, and who wants to learn how to use what they have in their sketchbook as a starting point for textile work should check out Melanie's new book, as well as her first book Inspired to Quilt, which I have mentioned many times before on this blog.

Thanks for visiting, and stay tuned for more of my explorations into colour and cloth. - Annika

6 May 2012

Spider Lily

I just had to post a couple of images of my spider lily, which is in bloom. It's been many years since the last time, and I've been waiting and hoping every spring since that. To my great joy I discovered a flower stem a week ago and today the first of five buds opened. The scent is wonderful: vanilla and cardamom. I keep returning to it to admire its beauty and inhale the scent.

The flower stem with five hidden buds


The first bloom has opened


Isn't it wonderful? It's like a little piece of Thailand in my own home.

More Fun with Thickened Dye - and a brief explanation about thickened dye

One of my goals when I was on vacation recently was to explore Procion MX dyes in a variety of ways. I started by dyeing fabric with a low-water immersion technique (i.e. where you use just a small amount of dye instead of letting the fabric lie in a dye bath), and then I moved on to working with thickened dye. Some of my readers may be unfamiliar with the concept of thickened dye, so I'll explain it briefly. Thickened dye is simply a dye solution which has been thickened into a paste with the help of something like sodium alginate. Sodium alginate is made from seaweed, and mixed with water it turns into a gelly-like paste to which you add the dye. So why thicken dye and use that instead of fabric paint, you may ask? The main difference between fabric paint and thickened dye is that fabric paint lies on the surface of the fabric and stiffens it, whereas thickened dye is absorbed into the fibres, and when the excess dye and print paste is washed away, the fabric is just as soft as before. Depending on what effect you're after, you can work with either, or even both.

Today I want to share my experiments with direct dye painting and screen printing. I started my explorations into direct dye painting quite modestly by hand painting some x's on a monoprinted and sponge stamped fabric with a round brush.


After that I felt a bit bolder and made stronger marks with the brush, also on top of a monoprinted fabric.


The next thing I tried was to experiment with thicker and thinner dye. I kept adding water to the thickened dye while I was working, to see how thin I could make it before it became too thin. If the paint is too thick it's difficult to apply, but if it's too thin it'll spread too much on the fabric.


This rose was painted with thicker dye. It was pretty hard work to get the lines even.


This rose was painted with a very thin dye. It was easier to apply the dye, but as you can see, the lines are thicker and fuzzier than in the first rose.


The next sample was printed with a silkscreen over freezer paper bird shapes that I had ironed onto the fabric, and before I removed the masks I printed the surface with bubble wrap. After the masks were removed I filled in the details with thickened dye and a small brush. As expected, the lines that were painted on the dry areas inside the bird shapes wet on dry are crisp, whereas the ones I painted outside the birds wet on wet are fuzzier.


The next sample is only screen printed. It's an example of a positive print, where I've cut out a motif from ordinary printer paper and slid the paper with the tree-shaped hole under the silk screen and squeegeed thickened dye over the paper stencil.


I cut the tree out carefully with a craft knife and could use the tree shape as a mask and print a negative image too. I'm amazed at how crisp the lines are in these two prints. You wouldn't believe that these prints are made with a simple printer paper stencil, would you?


The printer paper stencil I used.


In this sample I used a commercial letter mask by Tim Holtz. Here I poured some purple dye over the screen before I pulled yellow pain with a squeegee. I love the effect!


In this last sample I dye painted a motif with a narrow flat brush. I did this sample last night and it is still batching. I enjoyed working with the flat brush, as I found it easier to make thick and thin lines with this brush than with the round brushes I tried earlier.


And that's all folks. I've put away all my dyeing utensils for now, and my little home is returned to order until the next time. Which I hope will be soon, because I've had a lot of fun and there's plenty more interesting things to try. So watch this space. ;-)

Thanks for reading this far, and I hope to see you again soon! - Annika

4 May 2012

Fun with Thickened Dye

So now I've dyed all this fabric: 72 differently coloured skinny quarters in all. What do I do with them? The colours are yummy, but let's face it: it's a little boring with just flat colour.

In my last blog post I showed you a flour resist technique I tried on some of my hand dyed fabrics. Here is the next thing I tried: stamping, monoprinting and stencilling with thickened Procion MX dye. I even tried monoprinting with a little stamp. Anything I could think of. (And of course you could do all the things I describe below with ordinary fabric paint too.) Here's some of my favourite samples:


Monoprinting. The pattern is made with a sponge dauber. I really like this effect. You'll find an image of the sponge dauber I used when you scroll down.


Stencilling. I used the stencil I so painstakingly cut a while back. The stencil is really quite unwieldy and not an example of a good stencil, as it's nearly impossible to handle as it is. The shapes get tangled and it's a nightmare to work with. This time, however, I put it under a silk screen, which made the application of thickened dye a lot easier.


Monoprinting. The pattern in this monoprint is made with a cheap paint brush and a silicone paint shaper. This technique quickly became a favourite. You'll find an image of the paint shaper I used when you scroll down.


Monoprinting with a stamp. I should have explored this technique a little more than I did as it was great fun. I combined a simple square-shaped stamp with monoprinting. I applied thickened dye to the stamp and made marks on the surface before printing.


My favourite tools: the humble sponge dauber and a silicone paint shaper:


I've written a whole blog entry about the paint shaper before, when I discovered that it could be used for applying masking fluid on paper. Check it out here.

This is a sight that makes my heart sing:


But wait - there's more! I've also tried screen printing and direct dye painting with thickened dye, so stay tuned for that. I just need to wash the fabrics before I can show you the results.

Thanks for visiting my blog and see you again soon! - Annika