Showing posts with label Spray painting. Show all posts

24 November 2015

Wonderful Light - Making the background

Two weeks ago I promised I'd be back with more process images of how I made my award-winning quilt Ex Tenebris Lux. I realised that it's quite a long process, so I've split it into two parts. This is the first part, which is all about how I made the background fabric.

I already told you that the quilt was inspired by a page in one of my art journals. If you remember the image you may also remember that it had an Asian feel to it. Regular readers of this blog will have noticed that I've been inspired by Japanese design for the last two or three years.

There are two areas of Japanese design that I'm particular inspired by: shibori dyeing and sashiko embroidery. In the quilt I looked to sashiko for inspiration when I needed something to bring interest into the background. I found a sashiko pattern called maru shippo, which contains circles and is therefore connected to the sun as the circle is a Japanese symbol for the sun. It felt perfect for my quilt, and I began by making a maru shippo stamp and stencil for the background.
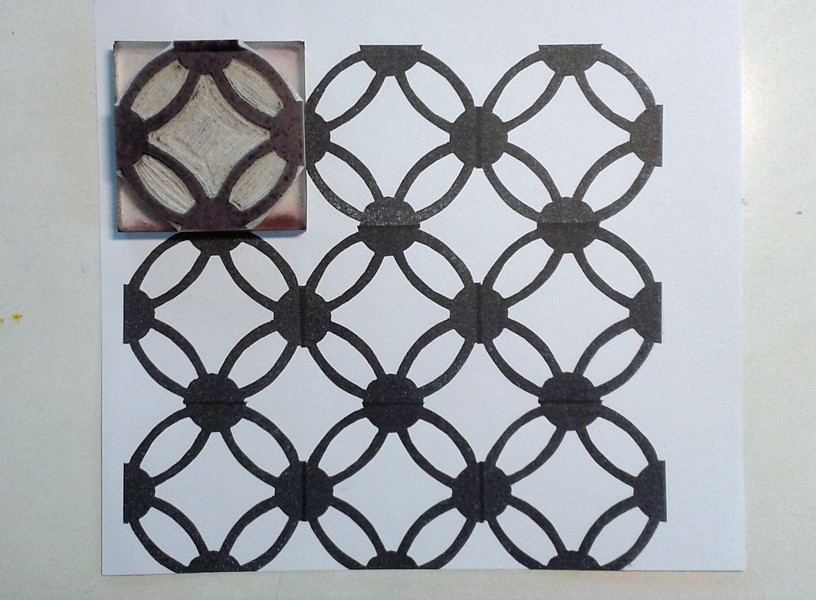


The reason I made both a stamp and a stencil was that I wanted to have a dialogue between darkness and light as well as positive and negative printing. In other words: my palette of choices for texturizing the background was to print with a colour that was darker or lighter than the base fabric and with a tool that let me print a positive image (the stamp: the motif has a different colour) or a negative image (the stencil: the background has a different colour). I used textile paint in both a thick and a thin consistency. Thick for printing, thin for spraying. The finished background looked like this. I knew the middle would be covered by the figure, so I didn't worry too much about that area.


The base layer was painted wet in wet with silk paints before I printed it, and I used a wooden frame to stretch the fabric prior to painting at that stage.

The background formed four main areas in my mind: shadow, light and two areas of transition.

The shadow

The transition from dark to light 

Light

Light defeating darkness

That was a bit of information about the background layer. Next time I'll show you how I painted the face and tell you a little about the quilting process.

Thanks for reading! See you again soon!

10 August 2014

Wake-Up Bells

Today is the final day of Festival of Quilts in Birmingham, and the winners have already been announced, so now I'm safe to publish images of the quilt that was sent there. As I've already mentioned here, the theme this year was In My Garden, and spring was the season that was given to Finland. I chose the lovely snowdrop, and titled the quilt Wake-Up Bells. Here's an image of the whole quilt, as well as process images and some detail shots of the finished quilt. As mentioned, it will be on tour for two years, so I took lots of photos before I sent it off.

The size of the quilt is 30 x 30 cm (12" x 12"). It's a wholecloth printed and painted quilt with collage elements between cotton and a layer of silk organza.


First of all I made a preliminary plan of the quilt on watercolour paper to help me make decisions about the colour scheme and texture before I started adding paint to fabric.


I printed cotton with pigment (textile) paint and various handmade and found stamps, transferred the pattern to the cotton with a mechanical pencil and painted the hair with a brush and pigment paint.


I also printed and spray painted silk organza,


and the cotton fabric that I used to soak up the paint that went trough the sheer organza was used for the back of the quilt.


I outlined the image with Derwent Inktense pencils, and started adding the collage elements.


I added the organza over the cotton base fabric, free-motion quilted the whole thing and added hand embroidery as a finishing touch. Here are some close-ups of the finished quilt:


If you're interested in this way of working, I recommend looking up Melanie Testa's book Inspired to Quilt. Melanie works with dye in the book, but it's also possible to use pigment paint, as I have done, if that's more accessible to you.

Thanks for visiting!

18 July 2014

Spring Into Action

I've been away from this blog for so long that I'm at a loss how to start again. So I'll just start with the most important thing that has happened this summer, apart from my move from Helsinki to Jakobstad (or Pietarsaari, which is the Finnish name for my new home town).

By the end of May I submitted my entry for the The Quilters' Guild Challenge at the Festival of Quilts in Birmingham this August. The National Guild in Finland, FinnQuilt, accepted my art quilt, and it was sent to Birmingham together with 15 other quilts. After the exhibition, it will go on tour for two years, and you can probably image how pleased I am about this. It's the first time that I've participated in anything like this, and it's all very exciting.

The theme this year is 'In My Garden', or the seasonal garden, and spring was the season that was given to Finland. As soon as I read about the competition and the theme I knew what I wanted to do. But since it's a competition and the Festival is still about three weeks away, I can't yet publish any images of my finished quilt. However, as I know there are people who are curious and eager to see what I've made, I'll post some sneaky images as a teaser.

In fact, I've already posted one sneaky image of a sketch in this blog entry. Here are a few more.

This piece of fabric was used to soak up extra paint while I was working on organza, and I realised afterwards that it was also the perfect fabric to use for the back of the quilt. Waste not, want not! I printed with crumpled paper, monoprinted with an acrylic block and spray painted through a plastic doily.


In a spring garden there has to be spring flowers, and you can probably make out which flower I chose, even though I'm just giving you a sneaky view from the back of the quilt.


And spring means the return of migrating birds. This is a part of the quilt that I'm particularly pleased with.


Thanks for visiting, and I hope to bring you more news soon!

2 February 2014

Knot bag

A couple of weeks ago I posted images of a bag project, where I used spray paint with freezer paper resists. When I last wrote about this project I hadn't decided whether to embroider the resisted shapes or not. Of course I couldn't resist (if you pardon the pun) stitching them, as I found the perfect embroidery thread in my stash. A skein of hand dyed embroidery floss from Oliver Twists Fibres that I got in Birmingham last August. I mean, feast your eyes on this:


(The fabrics in the background are from Liberty, and I am saving them for something special.)

So, here I am stitching away. In fact it was fairly quick, as I did just a running stitch. I love running stitch. Simple, yet effective.


This little bag is perfect for holding my yarn when I knit or crochet:


One handle is shorter, and forms a simple knot when it's slipped over the longer handle:


And If you're curious about the crocheted thing dangling from the bag, it ended up in this project (which is still in progress):


Have a great day, and thanks for dropping by!

- Annika