Showing posts with label Stencils. Show all posts

24 November 2015

Wonderful Light - Making the background

Two weeks ago I promised I'd be back with more process images of how I made my award-winning quilt Ex Tenebris Lux. I realised that it's quite a long process, so I've split it into two parts. This is the first part, which is all about how I made the background fabric.

I already told you that the quilt was inspired by a page in one of my art journals. If you remember the image you may also remember that it had an Asian feel to it. Regular readers of this blog will have noticed that I've been inspired by Japanese design for the last two or three years.

There are two areas of Japanese design that I'm particular inspired by: shibori dyeing and sashiko embroidery. In the quilt I looked to sashiko for inspiration when I needed something to bring interest into the background. I found a sashiko pattern called maru shippo, which contains circles and is therefore connected to the sun as the circle is a Japanese symbol for the sun. It felt perfect for my quilt, and I began by making a maru shippo stamp and stencil for the background.
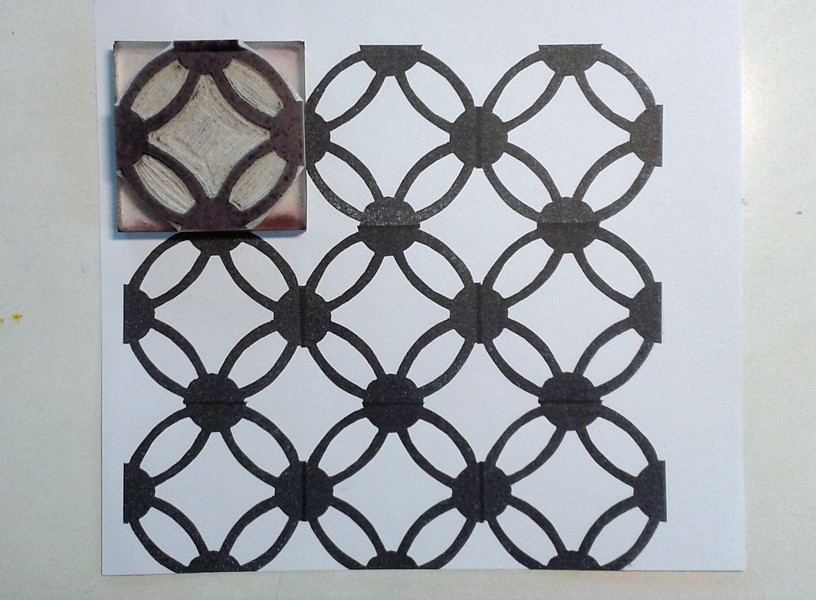


The reason I made both a stamp and a stencil was that I wanted to have a dialogue between darkness and light as well as positive and negative printing. In other words: my palette of choices for texturizing the background was to print with a colour that was darker or lighter than the base fabric and with a tool that let me print a positive image (the stamp: the motif has a different colour) or a negative image (the stencil: the background has a different colour). I used textile paint in both a thick and a thin consistency. Thick for printing, thin for spraying. The finished background looked like this. I knew the middle would be covered by the figure, so I didn't worry too much about that area.


The base layer was painted wet in wet with silk paints before I printed it, and I used a wooden frame to stretch the fabric prior to painting at that stage.

The background formed four main areas in my mind: shadow, light and two areas of transition.

The shadow

The transition from dark to light 

Light

Light defeating darkness

That was a bit of information about the background layer. Next time I'll show you how I painted the face and tell you a little about the quilting process.

Thanks for reading! See you again soon!

25 August 2014

Stencil Frenzy

Just over a year ago I discovered a new source of inspiration: the Australian artist and art teacher Jane 'Danger' Davenport. (Yes, she really is dangerous: addictively funny and inspirational.) You will hear her name again on this blog, as I have some really exciting things going on at the moment.

Today, however, I'm going to talk about stencils. The reason I mentioned Jane at the start is that earlier this year she released an Art Lesson with Cloth Paper Scissors magazine 'Stencil Auditions', which triggered a veritable stencil frenzy in my life. The Art Lesson is downloadable, very affordable, and very, very inspiring. So inspiring that I immediately went ahead and ordered a whole bunch of stencils online. Many of them were water-themed (corals, waves and ripples), for a reason that I will return to later. :-)

My new stencils had barely arrived before something wonderful happened. A friend of mine asked me if I wanted to borrow her Silhouette Cameo cutting machine and try it out for stencil cutting. Did I ever!! I did a bit of research, and got started cutting stencils from stencil plastic. I couldn't belive how well it worked. Each time I removed a freshly cut stencil from the machine I couldn't help laughing out loud from pure joy. The only cloud on my horizon was that I was just about to move, and really didn't have much time to spend on the Cameo, as I was supposed to go through my stuff and pack it into boxes.That's why my stencil-cutting was a bit frenzied.

Test-cutting my first stencil (a face)


I had time to design (the cutter comes with a software that you can use to design your own stencils) and cut about 12 stencils before it was time to return the Cameo, and I have to admit that I'm really tempted to buy one at some point. I'm all for hand-cutting your own stencils, but it's very time-consuming if you do it from quality stencil plastic, you'll end up with a sore hand, arm and neck, and you'll never achieve the precision of a computer. Some patterns are simply not possible with, or worth the time and effort of, hand-cutting. I guess it's all a balancing act where you need to ask yourself when you should hand-cut, or when to buy a commercial stencil or use a cutting machine. There's a time and place for all three of them.

Oh, and one thing that I love about the cutting machine is that all those perfect little bits that are cut out can be saved and used for masks:


If anyone has a Silhouette Cameo and would like to know what settings I used for my stencils, here's the information. But you might have to experiment to get the right settings, as materials and machines differ. So consider these settings a guide and a starting point:

Speed: 1
Thickness: 30
Blade: 5
Double cut
Brand of stencil plastic: Crea Pop

Here are more images of my favourite stencils:


So far I've only used them for work that I've created for Jane Davenport's Art Lessons (on gesso and stencils) and online workshop 'Supplies Me'.


If you're like me, and have a whole Museum of Art Supplies that you never use, I recommend Jane's Art Lessons and workshops. You cannot help being inspired to use everything you have!

Thanks for dropping by!

26 January 2014

Wacky Crocodiles

I had fun this week, venturing out into The World of Screen Printing, which has a lot of white territory for me still. And what I was lacking in refined technique, I compensated with joyful abandon. I'd cut a stencil from paper and decided to try my hand at multiple prints in a repeat pattern. And not only that - I also decided to mix my colours directly on the screen. This is the result, and I call the pattern my 'wacky crocodiles'.


Some prints were perfect, others a little fuzzy around the edges, but that's how it is in life. We're not all perfect, but still lovable in our own little ways.

Here's a close-up:


I didn't measure anything, and in order to get the crocs roughly in the right place, I used the cut-out from the stencil as a placement guide: I positioned it on the fabric, aligned the screen and stencil with the cutout, removed the cutout and printed. It worked like a charm, except for the time when I forgot to remove the cutout. Imagine my surprise when I lifted the screen and the fabric was still white. But the cutout was pretty:


I'm going to collage it into my sketchbook, together with the stencil. I couldn't resist making some doodles on the stencil after I'd finished with it.


Thanks for visiting my blog and see you again next time!

- Annika


19 January 2014

Personalized Sponge Cloths

Just before Christmas I was inspired to work with stencils, and that inspiration has continued after the holidays, partly because I'm teaching stencil techniques at the moment. Today I want to show you a couple of small projects that perhaps could make your household chores a little more fun: personalized sponge cloths. You can buy sponge cloths without print in craft shops.

You've had a sneak peek of the first one already, but as it was a gift for my mum, I didn't want to reveal it completely and spoil the surprise for her. For this first one I've used freezer paper, which I cut into a sort of 'snowflake'. The artist Melanie Testa was the first person to open my mind about the possibilities with freezer paper 'snowflakes' (See e.g. Quilting Arts Magazine issue 21, spring 2006). Paper 'snowflakes' don't have to look like the snowflakes we all cut when we were kids. So I cut a Westie snowflake for my mum. (Regular readers know that I keep referring to Fia the Terri(fi)er. She has an impressive bark, but she really is a very gentle and sweet dog.)

Here you can see the design process: sketch, folds, cut-out, stencil:


And here is the result. As the sponge cloth was quite porous, the paint went under the edges a little bit and made them slightly fuzzy, so I used a Pentel Gel Roller for Fabric to tidy up the edges. I love that pen!


And then I decorated a sponge cloth for myself too, but for this one I didn't use a stencil, only a fabric marker: a Tsukineko Fabrico Dual Marker. A lovely and juicy pen that comes with a bullet tip and a brush tip. A lot has happened with fabric markers since I tried my first one many years ago.


That should add a bit of pizzazz to my kitchen.

Thanks for visiting and see you again soon!

- Annika

14 January 2014

Spray It, Don't Just Say It!

I'm teaching a class on spray painting on Thursday, and that inspired me to set up a spray painting studio in my kitchen today. Yes, you really do need to be generous with newspaper and whatever you use to protect your surroundings. I guarantee that the paint  will end up everywhere.


As for the fabric, this piece is a work in progress. I used a couple of new toys on it: a felt table topper and a stencil and mask I cut with a soldering iron.

In the Fall 2013 issue of Stitch magazine there are instructions for a really cute 'otomi-inspired knot bag', which I've been meaning to make for a while. After having suffered from severe lethargy most of the day, I finally got started on it.

I cut the pattern pieces, ironed freezer paper masks in place, and applied spray paint. Here the paint is drying. Pretty cool, but wait for the big reveal!


The drop cloth is starting to look interesting too!


And here it is, with freezer paper masks removed (sorry, but the light is really bad for photography this time of year):


In close-up:


And I'm definitely not going to throw away the freezer paper masks!


Now I only have to decide whether to embroider it like the one in Stitch magazine, or whether to just assemble it straight away. Whichever I decide, it's going to be a really fun little bag.

Thanks for dropping by, and see you again soon!

- Annika

31 December 2013

Happy and Creative New Year 2014!

It's been all about slow stitching this Christmas, and mostly about Alabama Chanin. I've been working on the fabrics I stencilled earlier, and finished the cuffs fairly quickly.


I then moved on to another hat (in this country you can't have too many hats, cuffs, mitts and socks),


on which I'm also making good progress.


But it's not all about hand stitching. I also wanted to try machine stitching an Alabama Chanin project, and started with a sashiko-inspired pattern ('Seven treasures'). The image below isn't patricularly inspiring, but as you can see, I'm using tissue paper as a stitching guide in this case, instead of stencilling. The beige fabric is the backing fabric, which will be revealed when I cut through the top fabric, which is violet. More images later, when I've made more progress.


Thank you for visiting my blog! I  wish you a very Happy and Creative New Year 2014. May your life be filled with happiness, and your stash bursting with inspiring supplies!

- Annika


21 December 2013

'Tis the Season to Stencil, Part 2

My progress so far:

I used freezer paper and a well-used plastic stencil. The designs are 'Anna's Garden' from Alabama Studio Sewing + Design and 'Bloomers' from Alabama Stitch Book, both by Natalie Chanin. The project in the middle is my own design, but it's going to be a surprise for someone, so I can't reveal any details yet.


I felt that silver on black was a bit too much for what I had in mind, so I added black pigment to the silver paint and got a gorgeous hematite. The pink is a bit overwhelming, but part of it is going to be cut away, so I think it'll be ok.


Ready to stitch! The perfect Christmas project: easy, relaxing and meditative.

Thanks for visiting, and more news soon!

- Annika

20 December 2013

'Tis the Season to Be Stencilling

I'm back in the saddle again. Lots of creative stuff brewing around the house. Today I'm stencilling. I've been working on a freezer paper stencil for another Alabama Chanin-inspired project all morning. A lot of work, but it's going to be fantabulous when finished. At least if things go according to plan. A few more cuts and I'm ready to apply paint. I'm thinking silver on black.


The pattern is Anna´s Garden from the book Alabama Studio Sewing + Design.

More images soon. I'm pretty excited!

- Annika


9 June 2013

Poppy Love

After not having been very active on this blog for so long, it feels a bit difficult to get started again. What should I write? How should I start? Should I apologise to you, my reader, for my inactivity? Well, I think I'll just say that there's a time for everything, and a season for every activity under the heavens, and with so many things going on and such a big change in my life over the past year, blogging had to take second place. But I missed sharing my projects and discoveries with you, so I will make an attempt to breathe new life into this blog now. And I will start by sharing a little piece of quilt art that I finished recently.

I started working on this mini quilt in December, and I've shared a couple of process images before here. It was basically finished and part of an exhibition in January (link), but I wasn't 100 % happy with it, so it's been hanging around looking a bit forlorn since the exhibition, until I took pity on it and added what I felt was necessary. And now I'm quite pleased with it. I attached it to a canvas frame, which will make it easier to display, as well as make it look less like a little potholder on the wall and more like a proper piece of art.

Ok, enough talk. Here are the images:


The size of the mini quilt itself is 15,5 x 15,5 cm (6" x 6") and the techniques include monoprinting, stencilling, fabric markers, fabric collage, Free-motion machine quilting, hand embroidery and beading. The name of the quilt is Papaver (2013). Papaver is the Latin name for poppy.

Thanks for reading! More to come soon, because I'm bursting with projects and new things to try. :-)


18 July 2012

More Stencilling!

There are certain names that I regularly return to in this blog. One of them is Melanie Testa, as you know if you've read my blog lately. Another name is Natalie Chanin of Alabama Chanin.

As soon as I finished my pretty purses I turned to another couple of projects that have been on my to-do list for a while. A couple of years ago I made myself a bandana according to the instructions in Chanin's book Alabama Stitch Book, but I've wanted to make myself a proper garment too. While I've been biding my time and soaking up knowledge, I've bought all three of her books, and have a whole Alabama Chanin library by now. I love all her books, and in the last one you get full-sized patterns for an Alabama Chanin wardrobe, along with instuctions, tips and inspiration. So the time is ripe to get started. I've also found it hard to just sit and watch while my friend Cheryl Razmus is whipping up garment after garment. Have a look at her gorgeous creations on Flickr.

I decided to start small and make a simple bucket hat and fitted top to try out the patterns before I embark on anything more complicated and time-consuming. So I dug out the good old 'Bloomers' stencil I used before for my bandana, and used it to print on the fabric for the hat


and for spray painting on the fabric for the fitted top.


The spray painting technique is what Chanin calls 'faded leaves' and the effect is created by spraying thinned paint onto wet fabric for a watercolour look. My paint didn't run as much as I expected, probably because the paint wasn't thin enough, or the fabric wet enough, but I'm pretty pleased anyway. I'll go for a runnier look next time. The main thing now is that I get an interesting fabric for trying out the pattern. I want to be sure of the fit before I invest all that effort into a more elaborate garment.

I'd just got rid of old, flaking nail polish when I got this new manicure. Oh well.


I didn't want to waste the paint that collected on top of the stencil so I flipped the stencil onto a piece of cotton and got this interesting texture.


I'm really exited about a new discovery I've made in the field of textile paint. Well, to be honest, I've known about these products for a long time, I just wasn't ready for them before now. I've mentioned the Finnish brand Emo Tuotanto's fibre reactive dyes before on this blog, but now I've also tried their mediums for printing on fabric. They have a thicker medium that is used for printing and a runnier medium that can be used for sun printing or spraying. The great thing about these mediums is that they come clear and you add the pigment yourself. So you can mix any colour you like in any consistency. I love it! Why haven't I used them before? (They also carry ready-mixed paints, which I have used until now.)

Liquid medium and print paste, along with liquid pigments to add to the mediums.


I realise that it might be difficult for my international readers to get hold of these products, but perhaps your own national brand carries something similar? Have a look around next time you are looking for textile paint! It's great fun to have the freedom to mix your own colours.

Thanks for visiting! To be continued... - Annika

16 July 2012

Two More Pretty Purses

By now I've quilted all three pretty purses (please refer to this blog entry for more information about pretty purses, and images of the first purse I quilted), and I'm off to buy zippers. Before I dash off, however, I'll share process photos of the other two purses.

Pretty purse nr 2:

Printed cotton and silk organza 
The two layers aligned
and quilted

 Pretty purse nr 3:

Printed cotton and silk organza
 The two layers aligned
and quilted

Thanks for visiting! I hope to have images of the finished purses soon. - Annika