Showing posts with label Dyeing. Show all posts

20 February 2017

Things Are Cooking in My Kitchen Again

It's been ages since I did any dyeing. Yesterday I decided to change that and to try something I haven't done before: acid dyeing wool with fibre-reactive dye. I have a knitted scarf with matching wrist warmers that I made several years ago from some lovely hand painted 100 % merino wool from Uruguay. You can see the original post I wrote about the wool and the scarf here.

The scarf

However, after the yarn had been knitted, the overall impression was a bit more orange and speckled than what I had expected and this has bothered me ever since. Well, I'm a dyer, so why should I let something like that bother me? So I got out my pot and dye and got started.

Double, double, toil and trouble. Fire burn and cauldron bubble...

I normally prefer cold-water and low-water dyeing techniques to hot water and immersion dyeing, but I enjoyed trying something else for a change. I haven't had much experience in dyeing wool and using an acid dye bath instead of an alkaline one, so I was curious to see the result. Wool takes a bit of patience as you can't rush the process unless you want your yarn or knitted garment felted in the process. Many of us have indeed personal experience of what happens when you throw a woolen garment in hot water and agitate it. I managed to make a trivet out of my favourite beret many years ago.

The result was perhaps not as saturated as I expected, but I love the way the original colours  (violet, orange and pink) still shine through even though the overall colour has been modified. The scarf is much nicer now that the lighter areas have been replaced with red.


Just enough red to even out the colour, but preserve some of the original colours.

I'm pretty sure this will be a renaissance for this scarf. In fact, I've even used it indoors today because it's so soft and cosy.


Thanks for visiting my blog! I hope I've inspired you to give overdyeing a go if you have some item of clothing in the back of your wardrobe that just needs a bit of colour adjustment. Just remember that synthetic fibres do not accept dye like natural fibres, so make sure you check the fibre contents first, and read the dye manufacturer's instructions carefully before you start! Have fun!


23 January 2015

Use Your Treasures!

I was inspired by a recent blog post by Melanie Testa, where she writes that she's been printing cloth for years, and now wants to use up her stash completely instead of stashing and storing fabric. I can relate to that. I have loads of my own fabrics in my stash too. Some of the cloth is ugly, some is precious to me. But the point is: there is no point in storing it. It deserves to be used! "Using the things you have and make causes you to make more, doesn’t it?" Melanie says. And she's right! Whatever fabric I've dyed or printed - I can make more of! And if there is one that is exquisitely special and unrepeatable, well, why not use it for something I use every day so that I can enjoy it all the time? Why should I keep it folded up in a box? And when I make more fabric, there will be more exquisitely special and unrepeatable fabrics to use.

So, as a warm-up, I decided to make a coaster set from some of my hand-dyed fabrics that have a Japanese feel to me. I combined them with linen as a backing fabric, as I love the combination of printed cotton and plain linen.


The techniques that have been used to pattern the fabrics are: low water immersion dyeing, shibori, direct dye painting and printing, soy wax resist and discharge. I was quite surprised by how many techniques I'd managed to tick off!


Thanks for visiting my blog! Go forth, my friend, and use your fabrics. And then: make (or buy) more lovely fabric!


20 October 2013

A Jarful of Fabric Candy

I recently discovered that my favourite key holder was well past its best, and decided to make myself a new one. And while I had my fabrics, iron and sewing machine out I figured I might as well make a whole batch for coming needs. I put them in a glass jar, to cheer myself up in the darkness of late October in Finland. It's like a jarful of fabric candy.


Here are some of them in close-up. I like to use my own hand-dyed and surface designed fabrics in combination with linen.


Now I just need to get enough key rings to finish them.

Thanks for dropping by, and see you again soon!
- Annika

28 September 2013

I Can Dye Happy Now

One of the dyes that I frequently refer to on this blog is Procion MX dye. It's an easy and versatile dye that I enjoy using. There's just one problem: I can't find it in Finland. So I've looked at some of the dyes that are more easily available to me, and one that seemed well suited for the techniques that I have explored with Procion MX dye is a cold water reactive dye (based on Remazol) by the Finnish company Emo-tuotanto Oy. I have also mentioned this brand before on this blog.

To be honest, when I first started exploring the Emo dyes, I was rather disappointed. I did exactly what I did with the Procion MX dye, but I didn't get the effect I was looking for. What I got was something like what you see on the right, but what I really wanted is what you see on the left.


I assumed that the dye was so different from the Procion MX type that it just wouldn't work in the same way. However, after doing a bit of reasearch and making a few changes to the way I work, I have discovered that it is after all possible to achieve similar effects, and now I can dye happy.

First I did a 12-step gradation with the three primaries:


Then I did a 7-step gradation with a split complementary colour scheme:


And then I did a 5-step gradation with tints and shades:


And I love the results and the simplicity of my new method, which I'll get back to later. For now, I'll just let you feast your eyes on the rainbow that I have created. Looking at my stacks of ironed, neatly folded and colour co-ordinated hand dyes fills me with happiness and calm.


Yes, I was (am) one of those kids who will find great enjoyment and satisfaction in putting all the crayons and coloured pencils in the right order in the box.


The warm half of the rainbow


The cool half


Thanks for visiting!
- Annika

4 March 2012

Procion MX Dyes - a short explanation

I've just rinsed the last gradation, and next I intend to use up the last of the dye I mixed on Tuesday. First, however, I'll get back to what I promised yesterday: a simple explanation about Procion MX dyes to those of you who are unfamiliar with them:

Procion MX dyes are fibre reactive dyes, which means that they don't just sit on the fibres, but actually bond with the fibres through a chemical reaction. Procion MX dyes come in a powder form and you mix them with water in different concentrations depending on how bright or light you wish the colour to be. I started by mixing basic dye stock from the three primary colours yellow, red and blue (lemon yellow, fuchsia and turquoise):


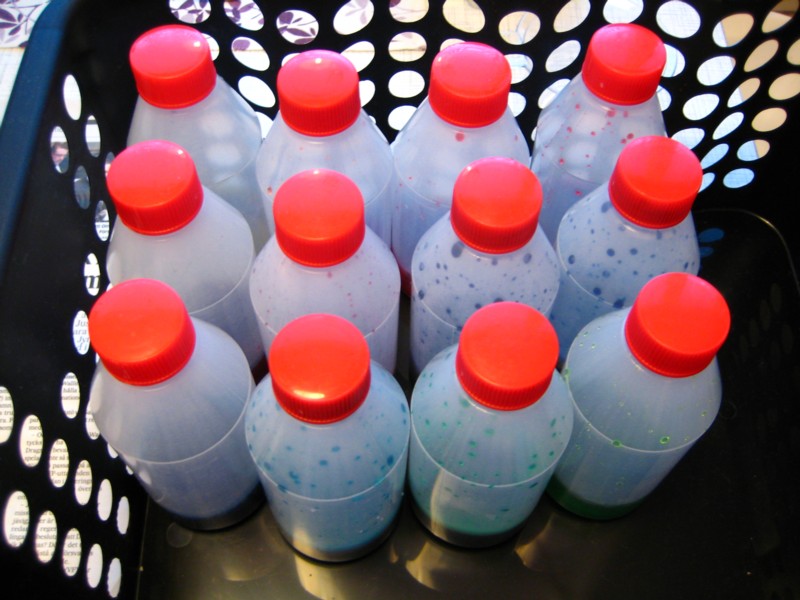
This dye stock was used in different quantities to mix secondary colours such as orange, violet and green. I mixed 12 colours before I started dyeing and put each in its own little bottle:


In order for the dye to bond with the fabric you need to add a fixative. With Procion MX dye you use soda ash or washing soda. You can add it to the dye itself, or to the fabric. In the gradation process I've done you soak the fabric in a solution of soda ash before you start dyeing.

I did the gradations in the following manner. First I put the fabric in a large tub and then I poured the ready-mixed dye (from the 12 small bottles) over it. I turned the fabric around in the dye to cover it well.


When the fabric was evenly covered with dye I put it in one of the ice cream tubs.


The dye needs moisture, warmth and time in order to bond with the fabric. Therefore I put the lid on the container and put the container in the warmest place in my home: the cupboard on top of the refrigerator. This process is called batching. I let my fabrics batch for about 24 hours.


When the fabric has batched long enough you rinse it out and wash it to get rid of loose and unbonded dye particles.

I hope this has explained the basics of the dyeing process that I've explored this week.

Tomorrow it's back to the old grinding wheel again. A week passes by so quickly, and I haven't accomplished nearly as much as I thought I would. But I'm pretty content anyway. It has been a joy to work with so much colour, and it feels like spring has sprung a little in advance in my home.

Thanks for stopping by. I will publish the results from the dark gradation soon, so stay tuned. - Annika

3 March 2012

Let There Be Lights

Here's the second gradation that I've done from the same three primary colours that were used for the first gradation (lemon yellow, fuchsia and turquoise), only this time the dye is diluted with water to make lighter values.


These 'mystery fabrics' were made with leftover dye


The third and final gradation (dark value) is now batching in the same old icecream tubs as the other ones before it. I've certainly practised my rinsing skills this week.

As I know that some of you readers are unfamiliar with Procion MX dye, I've decided to write a blog post that I hope will explain things a little. But that will have to wait for tomorrow, because I feel I've had enough of dyeing for one day. I think I'll just sit down, put my feet up and do something completely different.

Have a great weekend! - Annika

2 March 2012

Emo...

... but not what some may think. No, I'm not going to write about music and gloomy teenagers. I'm still preoccupied with dye. If you've been following my dyecation you might remember that I started on Monday (five days ago) with a Finnish brand of fibre reactive dyes by Emo-Tuotanto. I was suspecting that the dye was too old and that it wouldn't work, and decided to put it to the test. I'm glad to say that it yielded a very dark blue, so I won't have to throw it out yet.

Some of the fabric samples I did were very successful, others less so. But the less successful ones were like that due to bad technique rather than bad dye. The shibori samples were too loosely tied (I thought I didn't have to tighten them as much when they weren't going in a proper dye bath), the fabric I thought was going to be marbled was hardly marbled at all (so it just looked like a bad dye job) and the printing with liquid dye would have worked if I hadn't got a bit carried away and dribbled dye over it to make things merge a little (everything merged). But not to worry. I came up with a surface design solution, which I'll show you below.

Here are the ones that I felt were most successful:


The floral motif was made with wire that I bent into a flower shape and dipped into melted soy wax before stamping with it, and the stripey pattern was made with a silicone brush. These dark blue fabric would look great combined with sashiko embroidery...  :-9

As for the stamped sample, I rescued it by stamping over it again with the same stamp, but this time I used discharge paste instead of dye. I have a jar of Jacquard discharge paste in my stash of 'Things To Try Soon' (remember my stranded 'Try a New Thing Every Day'-challenge?), so that was two for the price of one: fabric improved and a new thing tried. In fact, I got so inspired by the discharge process that I picked out the bad marbling sample too and a stencil I've been wanting to try, and used the paste with that.


I cut this stencil in December, but was so exhausted by the way my life was going at that time that I never got round to trying it out. It's a bit tricky to use, because it's really too intricate to be a stencil. It would work better as a silk or thermofax screen. But I got a bit carried away... Again.


I cut it out very carefully, and can use the negative image as a mask. That's another two for the price of one!

1 March 2012

Greeted by a Rainbow

When I climbed out of bed this morning I was greeted by a rainbow.


A few more steps and I was met by this glorious sight.


I felt pure happiness. 

I believe that I’m severely colour-starved. For the last 4 months my world has just been brown, grey, black, white, muddy, slushy, dull, uninspired. Don’t get me wrong, I like winter. It can be absolutely beautiful. But you don’t get a lot of colour, do you? I’ve been reminiscing about last year’s trip to Thailand and all the gorgeous colours you see there. Playing with dye the past couple of days has made me realise how much I have missed colour. When I saw these tulips in the supermarket yesterday, I grabbed them. I love the combination of orange, purple and green. 


On Tuesday I started dyeing a 12-step gradation. I’m following Frieda Anderson’s instructions from her book ‘Fabric to Dye For’, and I started right from the beginning with a medium value gradation based on lemon yellow, fuchsia and turquoise. First of all, let me tell you that I grossly misjudged how long it takes to dye fabric. I’ve dabbled in dyeing before, in a happy-go-lucky style, but this time I decided to be a bit more scientific about it. (I even keep a dyeing notebook!) So, my first ambitious plan was to first do three gradations of a bright colour scheme, and after that three gradations in a warm colour scheme. Well, reality forced me to think again. I was knackered on Tuesday, and woke up with a splitting headache on Wednesday. I had crammed so much new knowledge in my head that it was practically bursting. So I gave myself a break and went out for a walk in the sunshine instead of carrying on with my over-ambitous plans. In the evening I rinsed out the fabrics and here’s the result of the first gradation (brights, medium value). 


These skinny quarters of fabric will be great as the base for further surface design techniques, such as printing, overdyeing, discharging and so on. Or I might make them into a little rainbow quilt for my wall. They make me happy. 

Look, even the trash looks great. 


However, my favourites are the mystery fabrics I created out of leftover dye.


Tonight I did the second gradation, with light values. The fabrics are happily batching in their little tubs right now, while I'm relaxing with my blog. I'll rinse out the fabrics tomorrow, and will probably do the third gradation (dark values) on Saturday.


In case you wonder what has happened to the Emo-experiment, I can reveal that it went well, and that I will report back within soon.


Thanks for visiting my blog, and see you again soon with more results from my dyecation. - Annika

27 February 2012

A Start

Today I finally got down to some actual dyeing. I must admit I was quite unprepared for all the preparations I needed to do before I could start my dyecation (dyeing + vacation). I still have a few things I need to get before I can start on the big project, but I did do a warm-up exercise today.

I've had some Emo Tutotanto liquid fibre reactive dyes (a Finnish brand) in my stash for a while, and I've been suspecting that the're well past their use-by date. So I decided to put them to the test. I chose the darkest colour, navy blue, and mixed a very dark value, which I hope will help me decide whether the pigments are destined for the bin or not. Keep your fingers crossed!

Preparations: scrunched-up, folded, twisted and soy wax printed fabric


Dyed fabric batching


The fabric in the foreground was printed with un-thickened dye, just to see what would happen, but I'm not too sure it's going to work. The dye has spread quite a bit already, obscuring the printed flowers. It'll be interesting to see what it looks like tomorrow. Everything is batching at the moment so I'll have to wait until tomorrow before I know whether the dye worked or not.

Thanks for dropping by, and do return soon for more reports from my dyecation. - Annika

20 December 2010

The coolest way to dye

Det kommer bara mer och mer snö i Helsingfors. Nu är 1/4 av mitt köksfönster täckt av snö. Min utsikt när jag sätter mig ner vid köksbordet är alltså en aning begränsad. Men visst är det vackert! Utedekorationerna jag köpte på Ekenäs julmarknad på lördagen för en vecka sedan kommer till sin rätt i det här vädret.

Eftersom det inte verkar bli någon brist på snö i första taget, bestämde jag mig för att göra ett till experiment med snöfärgning. Den här gången blandade jag två olika färger (magenta och ultramarin) och det blev ett ganska coolt resultat. Skrålla ner så får du se en jämförelse mellan de två experimenten. Är inte det här bokstavligen det coolaste sättet att färga tyg på?

Jag har också sytt en liten tavla åt en kär vän i Edinburgh, som jag hoppas hinner fram till jul. Jag vill att hon ska vara den första som ser tavlan, så jag erbjuder bara en liten tjuvtitt här på bloggen. Det var ursprungligen meningen att tavlan skulle se helt annorlunda ut (se UFO nr 3), men jag fick det inte att funka, så jag bytte plan. Den skotska poeten Liz Lochhead säger i dikten A Giveaway

if the rhythm's not right, it's not right,
it's simple
you've got to cut and cut and cut.
Rewrite.


Så jag tänkte om och nu är jag tillfreds.

På tal om UFO:n... UFO nr 1 blev faktiskt ett FO (Finished Object) och har fått ett nytt hem! Skrålla ner så får du hälsa på henne.


The coolest way to dye

We're getting more and more snow in Helsinki. At the momet 1/4 of my kichen window is covererd in snow. My view when I sit down at the kitchen table is therefore slightly limited. But it's oh, so pretty! The decorations I bought at the Ekenäs Christmas market on Saturday a week ago are really looking their best in this weather.

Since it doesn't seem to be any shortage on snow for a while, I decided to do another experiment with snow-resist dyeing. This time I mixed two different colours (magenta and ultramarine) and the result was really cool. Scroll down and you'll see a comparison between the two experiments. Isn't this quite literally the coolest way to dye?

I've also made a small quilt for a dear friend in Edinburgh, which I hope will reach her in time for Christmas. I want her to be the first person who sees the quilt, so I'm only offering a sneak peek on my blog. I originally planned this quilt in a completely different way (see UFO No. 3), but it just didn't work for me, so I changed my plan. The Scottish poet Liz Lochhead writes in her poem A Giveaway:

if the rhythm's not right, it's not right,
it's simple
you've got to cut and cut and cut.
Rewrite.


So I rethought it, and now I'm at peace.

Speaking of UFOs... UFO No.1 actually became a FO (Finished Object) and has got a new home! Do scroll down and say hello to her.


Vy från mitt köksfönster
View from my kitchen window

Snöklädd dekoration från Ekenäs
Snow-clad decoration from Ekenäs

Snöfärgning - coola mönster
Snow-resist dyeing - cool patterns

Glimt av tavlan jag skickade till Skottland
A glimpse of the quilt I sent to Scotland

Dockan som flyttade till Sverige
The doll that moved to Sweden