Please note that I've updated my teaching schedule, which you will find under the tabs above. My courses are at the moment held in different locations in Finland, and mainly in the Swedish language. However, I also welcome students who speak Finnish and English to my courses.
Undervisning hösten 2013
Observera att jag har uppdaterat schemat för min undervisning, och du hittar informationen under fliken uppe till vänster. Mina kurser hålls för närvarande på olika orter i Finland och främst på svenska. Deltagare som talar finska eller engelska är dock också varmt välkomna.
- Annika
20 August 2013


18 August 2013
The Calling of the Harebell
After a week of artist’s block... well, to be honest, it’s felt more like a life block, I had enough. I wanted to do something creative and fun, but something that wouldn’t be too demanding on my uncooperative brain. So I picked out a favourite image by the fairy artist Brian Froud (from the book Faeries. Described and illustrated by Brian Froud and Alan Lee) and started working on a pretty purse.
The
original image, slightly cropped

Ingredients for a fun time: rayon embroidery thread, zipper, iced parfait hand dyed fabric, image cropped, enlarged, modified and drawn on tracing paper

Free-motion quilting/embroidery through tracing paper

Image sewn, removal of tracing paper (tweezers are a girl's best friend)

Tying off threads and painting in the silhoutte with a Zig brush tipped fabric marker
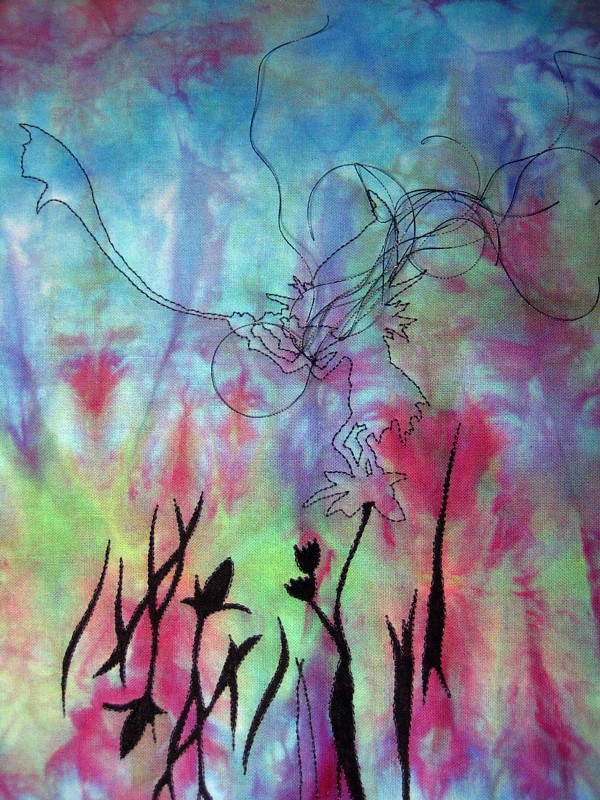
Silhouette finished

Background quilting started. Let's see how this develops. These weird and wonderful flowers weren't planned. They just invited themselves in. I'm letting the magic of the fabric decide how I quilt.

I'll post more images as I progress on my little fairy purse.
Thanks for stopping by! - Annika
25 July 2013
Gammaldags torg 2013
This is an announcement mainly for my Finnish readers, but if you scroll down I'll provide an explanation in English too.
Mamma och jag kommer att delta i Jakobs dagar i Jakobstad genom att vara med på Gammaldags torg lördagen den 27.7 mellan 9 och 16. Observera att platsen har ändrats och att torget i år hålls mellan Stadskyrkan och Skolparken. Även om du inte ska handla av oss, så får du gärna komma förbi vårt bord och hälsa på! Vi kommer bland annat att sälja


* * *
Mamma och jag kommer att delta i Jakobs dagar i Jakobstad genom att vara med på Gammaldags torg lördagen den 27.7 mellan 9 och 16. Observera att platsen har ändrats och att torget i år hålls mellan Stadskyrkan och Skolparken. Även om du inte ska handla av oss, så får du gärna komma förbi vårt bord och hälsa på! Vi kommer bland annat att sälja
Hemstickade pulsvärmare
(se mammas blogg för flera modeller)
t.ex. med pärlor och paljetter

eller volanger

Börsar i linne
med mina egna färgade och trycka tyger som accent


Mobilfodral i linne
med mina egna färgade och trycka tyger som accent

Påsar för smarttelefoner
i linne och med mina egna färgade och trycka tyger som accent

Välkommen förbi!
* * *
Mum and I are participating in a fair ("Olde Time Fair") during a yearly festival in Jakobstad called Jacob's Days. We'll mainly be selling beaded wrist warmers and the purses, pouches and cases I've made this summer. The last ones are all in linen and with my own dyed and printed fabrics as accents. It'll be fun, and I wish you could all come and meet us there!
Here's a link to Mum's blog, where you can see what she's been up to in front of the telly.
- Annika
24 July 2013
Iced Parfait on the Menu
Today was supposed to be a sunny day, but something obviously went wrong in the weather department. So I'll keep my fingers crossed for tomorrow instead. Meanwhile, I'm going to share with you a cool technique I tried a few weeks ago on a sunny day: ice cube dyeing.
I followed Carol Ludington's directions for iced parfait in issue 57 (June/July 2012) of Quilting Arts Magazine. What you need is soda soaked fabric, ice cubes, fiber reactive dye in powder form and a tall container with a lid. Scrunch, pleat, fold or twist the fabric, and place it in the container. Add a layer of ice cubes and sprinkle dye powder on top of the ice cubes. Then add another layer of fabric, ice and pigment. There was room for three layers of fabric, ice and pigment in my container. This is what it looked like with all three layers:


At this point, when all the ice had melted, and there was a lot of muddy water in the container, it was time to feel a bit worried:


I followed Carol Ludington's directions for iced parfait in issue 57 (June/July 2012) of Quilting Arts Magazine. What you need is soda soaked fabric, ice cubes, fiber reactive dye in powder form and a tall container with a lid. Scrunch, pleat, fold or twist the fabric, and place it in the container. Add a layer of ice cubes and sprinkle dye powder on top of the ice cubes. Then add another layer of fabric, ice and pigment. There was room for three layers of fabric, ice and pigment in my container. This is what it looked like with all three layers:

A close-up

One more close-up, just because of the yumminess

At this point, when all the ice had melted, and there was a lot of muddy water in the container, it was time to feel a bit worried:

But there was no need for worry (top layer):

Ok, admittedly the middle layer is pretty wild:

The bottom layer, to my surprise, wasn't mud coloured:

Iced parfaits will definitely be on the menu again. ;-)
Thanks for stopping by, and more fun stuff soon! - Annika
9 July 2013
Summer Party with Confetti & Tea
There are so many fun things out there to try that I don't know where to turn. When I opened the June/July issue of Quilting Arts Magazine I immediately found three things I wanted to try. I've tried two of them now (confetti dyeing, and discharging soy wax resisted fabric), and I'm sure I'll try sand painting very soon. It's one big fabric design summer party at the moment.
Today I'll show you the results from the confetti dyeing I tried recently, as well as the beginning of some tea dyeing I was inspired to try after reading India Flint's book Eco Colour.
Confetti dyeing is a ridiculously easy and fun dyeing technique, if you have dye pigment in powder form. You soak a piece of cloth in soda solution, place the fabric on a surface, arrange the fabric into folds if you want to, and then sprinkle dry dye powder on top with the help of a mesh. Batch as normal, rinse and wash. For more detailed information on the technique, please refer to Carol R. Eton's article in the June/July issue (#63) of QAM, pages 26-28.
On the first sample I sprinkled Procion MX dye on a flat piece of fabric:

On the next sample I did exactly the same thing as in the first sample, but then I used a pipette to drip soda solution over the fabric. When the liquid spread over the fabric, it moved the dye around and created blurry starbursts:

On the third sample I pushed the fabric into folds before sprinkling on the dye:

Pretty wild stuff. Another reason I was very pleased to see that it worked was because I used some old dye that had been lying around for ages. I've heard that Procion MX dye shouldn't be kept too long, but at least these dyes have aged gracefully. There's definitely nothing wrong with the colour saturation here.
Finally, let me just show you a dyeing experiment in progress. I read the section on solar dyeing in India Flint's book and decided to try it there on the spot. So I made some tea with a bunch of old tea bags that I've saved for tea dying. Then I accordion folded a piece of fabric, and in the folds I snuck in more tea bags, this time a herbal tea that produces a red liquid.

I crammed the fabric into a glass jar, poured tea on top, sealed the lid and put the jar in a sunny spot. Now I -only- have to wait a month before I can pull out the fabric and see what's happened. Luckily I have a lot going on at the moment, so a month will pass in no time.

Thanks for visiting my blog! There will be more fun adventures in the world of fabric design soon.
- Annika
Today I'll show you the results from the confetti dyeing I tried recently, as well as the beginning of some tea dyeing I was inspired to try after reading India Flint's book Eco Colour.
Confetti dyeing is a ridiculously easy and fun dyeing technique, if you have dye pigment in powder form. You soak a piece of cloth in soda solution, place the fabric on a surface, arrange the fabric into folds if you want to, and then sprinkle dry dye powder on top with the help of a mesh. Batch as normal, rinse and wash. For more detailed information on the technique, please refer to Carol R. Eton's article in the June/July issue (#63) of QAM, pages 26-28.
On the first sample I sprinkled Procion MX dye on a flat piece of fabric:

On the next sample I did exactly the same thing as in the first sample, but then I used a pipette to drip soda solution over the fabric. When the liquid spread over the fabric, it moved the dye around and created blurry starbursts:

On the third sample I pushed the fabric into folds before sprinkling on the dye:

Pretty wild stuff. Another reason I was very pleased to see that it worked was because I used some old dye that had been lying around for ages. I've heard that Procion MX dye shouldn't be kept too long, but at least these dyes have aged gracefully. There's definitely nothing wrong with the colour saturation here.
Finally, let me just show you a dyeing experiment in progress. I read the section on solar dyeing in India Flint's book and decided to try it there on the spot. So I made some tea with a bunch of old tea bags that I've saved for tea dying. Then I accordion folded a piece of fabric, and in the folds I snuck in more tea bags, this time a herbal tea that produces a red liquid.

I crammed the fabric into a glass jar, poured tea on top, sealed the lid and put the jar in a sunny spot. Now I -only- have to wait a month before I can pull out the fabric and see what's happened. Luckily I have a lot going on at the moment, so a month will pass in no time.

Thanks for visiting my blog! There will be more fun adventures in the world of fabric design soon.
- Annika
30 June 2013
I Found my Marbles
Today I'll show you my recent explorations into fabric marbling, but first let me show you what I did yesterday. It's become a tradition for a friend and me to go to Fiskars Village every summer (yup, that's where the world-famous orange scissors were born) and look at Finnish art and design, and to enjoy the yummy cakes at Petri's Choclate Room. (The cakes are prabably the main reason we go there, to be honest...)

Jealous?
Then let's return to the subject of marbling fabric. I've wanted to try it for some time, but haven't had the right equipment. Then I found some instructions that made the technique sound super easy, and I had a go. The only things you need are fabric, silk paint, wallpaper glue, and a flat-bottomed pan (dedicated to crafts). You mix the glue, pour it into the pan, drip silk paint onto the surface, make swirly-whirly patterns with e.g. a toothpick, lay down the fabric over the paint, lift the fabric immediately, scrape off the excess glue, let it dry, heat fix the paint, and rinse the fabric to get rid of the rest of the glue residue.
However. Things that sound easy-peasy are usually not as straightforward as they seem. It will take a bit of further experimentation before I'm 100 % happy with the results. But having said that, I am pretty pleased.
Below are pictures of the process. What surprised me the most when I started was the way the paints behaved. I had expected them to float out in a wide circle, like I've seen in other people's videos. But not with this technique. The paint drops stayed pretty much were they landed, and spread slowly in a lichen-like fashion (Swe: som lav):

I was pretty taken aback at first, and didn't quite know what to do. So I just aimlessly dragged my toothpick through the paint shapes in the hope of enlightenment.

Interesting, but far from what I had expected. So I tried adding a bit more paint, if that would encourage the paint to flow out more.

Nah, it didn't behave the way that I wanted it to. I felt pretty disappointed. But as they say, if you can't beat them, join them. The paint had obviously a mind of its own, and I would just have to play according to new rules. So I filled the whole surface with lots of paint drips, and dragged the toothpick through them in a much tighter pattern, and that's when magic happened:

This was a whole new ball game, and I was finally getting excited. Next, I tried to make spirals:

Gorgeous! More spirals!

What I now need to figure out is how to get stronger colours. I don't know if it's the scraping away of excess glue that causes it, but the colours on the back of the fabric are much stronger than on the front:

I guess I could use the back as the right side, but the pattern is less well-defined on the back, so I'm hoping to find a way of boosting the colour on the front. There's obviously more experimentation to be done, but I feel I got pretty far already. Something which felt pretty disappointing at the start turned into something really exciting. That's what makes the creative process so rewarding, isn't it? You never know what fabulous discoveries hide behind the next corner.
Thanks for reading this far, and see you again soon! - Annika

Jealous?
Then let's return to the subject of marbling fabric. I've wanted to try it for some time, but haven't had the right equipment. Then I found some instructions that made the technique sound super easy, and I had a go. The only things you need are fabric, silk paint, wallpaper glue, and a flat-bottomed pan (dedicated to crafts). You mix the glue, pour it into the pan, drip silk paint onto the surface, make swirly-whirly patterns with e.g. a toothpick, lay down the fabric over the paint, lift the fabric immediately, scrape off the excess glue, let it dry, heat fix the paint, and rinse the fabric to get rid of the rest of the glue residue.
However. Things that sound easy-peasy are usually not as straightforward as they seem. It will take a bit of further experimentation before I'm 100 % happy with the results. But having said that, I am pretty pleased.
Below are pictures of the process. What surprised me the most when I started was the way the paints behaved. I had expected them to float out in a wide circle, like I've seen in other people's videos. But not with this technique. The paint drops stayed pretty much were they landed, and spread slowly in a lichen-like fashion (Swe: som lav):

I was pretty taken aback at first, and didn't quite know what to do. So I just aimlessly dragged my toothpick through the paint shapes in the hope of enlightenment.

Interesting, but far from what I had expected. So I tried adding a bit more paint, if that would encourage the paint to flow out more.

Nah, it didn't behave the way that I wanted it to. I felt pretty disappointed. But as they say, if you can't beat them, join them. The paint had obviously a mind of its own, and I would just have to play according to new rules. So I filled the whole surface with lots of paint drips, and dragged the toothpick through them in a much tighter pattern, and that's when magic happened:

This was a whole new ball game, and I was finally getting excited. Next, I tried to make spirals:

Gorgeous! More spirals!

What I now need to figure out is how to get stronger colours. I don't know if it's the scraping away of excess glue that causes it, but the colours on the back of the fabric are much stronger than on the front:

I guess I could use the back as the right side, but the pattern is less well-defined on the back, so I'm hoping to find a way of boosting the colour on the front. There's obviously more experimentation to be done, but I feel I got pretty far already. Something which felt pretty disappointing at the start turned into something really exciting. That's what makes the creative process so rewarding, isn't it? You never know what fabulous discoveries hide behind the next corner.
Thanks for reading this far, and see you again soon! - Annika
22 June 2013
Purses and Pouches Galore
It seems I've been into bags, purses and pouches lately. I've produced quite a collection for different purposes, even on commission. Here are some of them.
Paper fabric purses for an upcoming mixed media class (in September):
(i Nykarleby: så håll korpgluggarna öppna för mera information, ni som bor i området!):

To create the paper fabric, I've used the methods described by Beryl Taylor in Mixed Media Explorations and Kelli Nina Perkins in Stitch Alchemy. There's more to explore, so I'm sure I'll return to this subject later in the summer.
A waist purse to hold my keys while I'm out jogging (much needed, and accomplished at last!):

A batch of coin purses to sell at a craft fair this summer (the fabrics are my own hand dyed fabrics):
And a pouch for smartphones, also for sale at the fair (again, my own hand dyed fabric). So far I've only managed to finish one of these, but I'm probably going to make more now that I've worked through the original construction method and made some improvements:


That's all folks! Have a great weekend, and I hope to see you again soon! - Annika
Paper fabric purses for an upcoming mixed media class (in September):
(i Nykarleby: så håll korpgluggarna öppna för mera information, ni som bor i området!):

To create the paper fabric, I've used the methods described by Beryl Taylor in Mixed Media Explorations and Kelli Nina Perkins in Stitch Alchemy. There's more to explore, so I'm sure I'll return to this subject later in the summer.
A waist purse to hold my keys while I'm out jogging (much needed, and accomplished at last!):

A batch of coin purses to sell at a craft fair this summer (the fabrics are my own hand dyed fabrics):
And a pouch for smartphones, also for sale at the fair (again, my own hand dyed fabric). So far I've only managed to finish one of these, but I'm probably going to make more now that I've worked through the original construction method and made some improvements:


That's all folks! Have a great weekend, and I hope to see you again soon! - Annika
Subscribe to:
Posts (Atom)