I started by drawing the face with all its features in a smaller scale and worked on that until I was happy with how it looked. I then I enlarged the sketch to full scale and did some serious thinking about how to deal with the face in the quilt.

I decided to be brave and hand paint the face in quite a naturalistic style. In order to get an idea of a suitable colour scheme and colour placement, I copied the smaller sketch into a sketchbook and painted it with watercolour first as an exercise – going straight onto fabric would most likely end in a waste of time and paint. I knew that painting on fabric is very different from painting on paper or canvas, but still it turned out to be a great deal more difficult than I expected. Fabric soaks up paint eagerly, which means that you can’t really push the paint around much and create soft blending, and you run a risk of getting uneven coverage as the paint dries with a crisp edge in one area while you are working in another. You need to be quick when you paint larger areas. This was the first version of the head, before I painted the facial features. I used freezer paper for pattern transfer and to stabilize the fabric when I was painting, which is why the fabric looks wrinkly.

One of the greatest challenges was the colour of the face. I knew that paint lightens as it dries and that the silk organza that would form the final layer also would lighten the colour, so I had to take that into account as I was mixing the skin tone (no chance of finding a ready-mixed skin tone!). However, when the paint was dry I realized that the colour was too dark. I hadn’t taken into account that the first layer of paint needed to be very light, as it would form some of the lightest areas in the face and that I would add darker tones when I added shading. This is where I had my first moment of slight panic. I had spent so much time paiting the head. Would I have redo everything?
I slept on the matter and then it happened: the thing that I love as a creative person. The Solution. The Lightbulb Moment. The Eureka! I get such a rush from solving creative problems. I didn’t have to paint it all again: only the face! It’s fabric. It's appliqué. It’s all going to be covered up and smoothed out with organza. Everything can be fixed. So I painted another version of the face, cut out the hair and jacket from the old version and applied that onto the new face with the help of fusible web. How’s that for a facelift!


I then fused the whole head onto the background together with some falling ume (plum) blossom, and added more paint for highlights and golden light falling on the skin.

Now that everything was in place, it was time to paint the silk organza. I stretched it in a wooden frame and placed the frame over the face and the background, which I protected from drips and spills with plastic sheeting. The reason for this arrangement was that I could now see the quilt top underneath the organza and knew exactly where to paint. When dry, I also monoprinted a light texture for added interest.

I was now ready to start quilting. I was quite nervous about the face so after I’d sewn the outline of the profile and the ear, I continued with the hair decoration, hair and falling blossoms. And then I had my second moment of slight panic. How on earth would I quilt the face? I did a bit of research on how other quilt artists have dealt with faces, and came to the conclusion that I would not attempt any kind of realism here. No topographical lines, or shading with thread. Instead I would go for symbolism. I started with some simple patterns on the neck to feel my way, and when I was sure that I was on the right track I turned to the scariest part of the whole process. Quilting the face. I picked a leaf pattern and let it loosely follow the contours of the face. What a relief when the final stitches were in place!
I often use masking tape to as a stitching guide

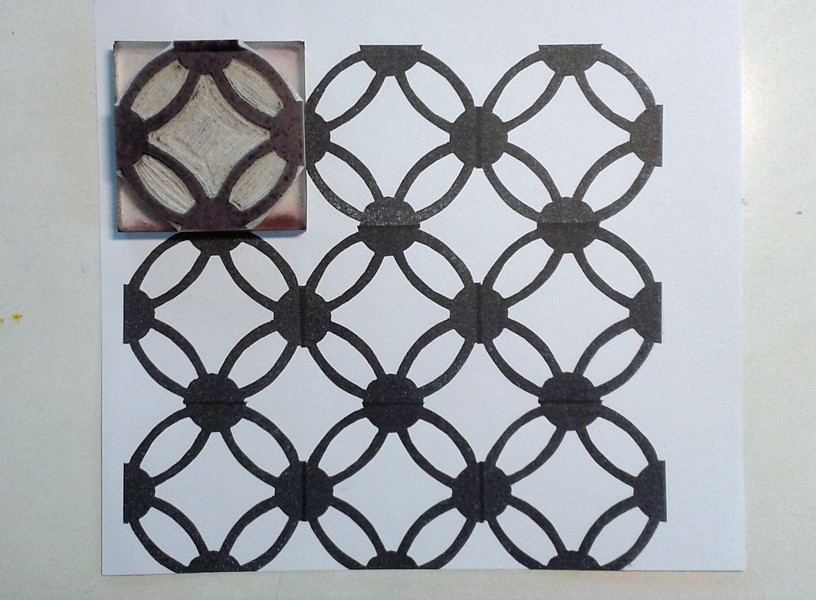
After this everything else was, if not a piece of cake, then at least not as nerve-wracking. For the background I chose three themes for the quilting: the maru shippo pattern, the ume blossom and rays of sunlight. For me the quilting is just as important as the main motif in an art quilt and it should always add another layer to the story of the quilt.

As a final touch I like to finish with hand stitching as it adds yet another dimension to the quilt and creates life and depth.

I hope you enjoyed reading about my process even though this blog entry was very long. Making the quilt was also a very long process. I poured my heart and soul into it and therefore it feels wonderful that all my effort was recognized and rewarded.

Thanks for reading!