Showing posts with label Stamps. Show all posts

24 November 2015

Wonderful Light - Making the background

Two weeks ago I promised I'd be back with more process images of how I made my award-winning quilt Ex Tenebris Lux. I realised that it's quite a long process, so I've split it into two parts. This is the first part, which is all about how I made the background fabric.

I already told you that the quilt was inspired by a page in one of my art journals. If you remember the image you may also remember that it had an Asian feel to it. Regular readers of this blog will have noticed that I've been inspired by Japanese design for the last two or three years.

There are two areas of Japanese design that I'm particular inspired by: shibori dyeing and sashiko embroidery. In the quilt I looked to sashiko for inspiration when I needed something to bring interest into the background. I found a sashiko pattern called maru shippo, which contains circles and is therefore connected to the sun as the circle is a Japanese symbol for the sun. It felt perfect for my quilt, and I began by making a maru shippo stamp and stencil for the background.


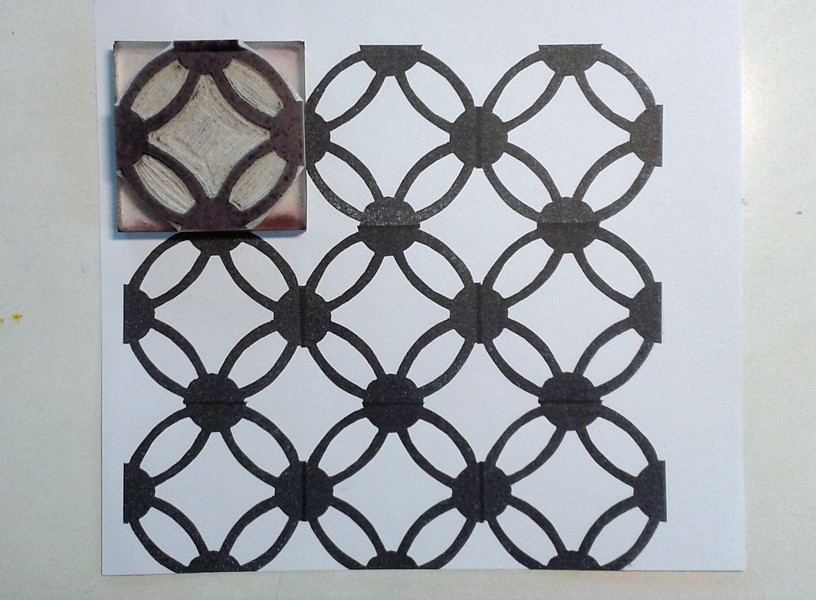
The reason I made both a stamp and a stencil was that I wanted to have a dialogue between darkness and light as well as positive and negative printing. In other words: my palette of choices for texturizing the background was to print with a colour that was darker or lighter than the base fabric and with a tool that let me print a positive image (the stamp: the motif has a different colour) or a negative image (the stencil: the background has a different colour). I used textile paint in both a thick and a thin consistency. Thick for printing, thin for spraying. The finished background looked like this. I knew the middle would be covered by the figure, so I didn't worry too much about that area.


The base layer was painted wet in wet with silk paints before I printed it, and I used a wooden frame to stretch the fabric prior to painting at that stage.

The background formed four main areas in my mind: shadow, light and two areas of transition.

The shadow

The transition from dark to light 

Light

Light defeating darkness

That was a bit of information about the background layer. Next time I'll show you how I painted the face and tell you a little about the quilting process.

Thanks for reading! See you again soon!

13 January 2015

Softcut December

By the end of last November mixed-media artist Julie Fei-Fan Balzer announced that December would be 'Carve December', i.e. that she would carve a stamp every day that month. Months ago I'd bought Julie's book Carve, Stamp, Play: Designing and Creating Custom Stamps, and I'd been eager to do try the techniques she describes in the book, but hadn't found time for it. When Carve December was announced I decided to take the opportunity to finally do some of the exercises in the book, and to develop my stamp-carving skills. I vaguely aimed for a stamp a day, but suspected that I wouldn't be disciplined enough to actually reach that goal. December is, as you know, a busy month. And I didn't reach 31 stamps. However, I did carve 20 stamps, which I'm really pleased with, because some of those stamps were quite complicated and time-consuming. Here's the whole collection:


I followed Julie's instructions very closely in the beginning, because obviously there was a reason why she'd included each exercise, and I didn't want to miss some important point. And I'm really glad I did because quite frankly, I was really surprised by the scale of the stamps - they were much smaller than the stamps I'd carved earlier on my own. When I reached the butterfly, I was appalled by the size: 2,5 x 2,5 cm (1 x 1 inches)! That's impossible, I thought. But I decided to give it a try, and not give up immediately, even if it proved to be as difficult as I thought. And here's the result:


I was amazed by the detail I'd managed to capture, and my confidence soared. I was using a linoleum-like material called SoftCut (Speedy Carve is the material that Julie uses, but it's not available where I live), and so far I hadn't been completely sold on it. It's very difficult to draw on the material, and it has a greasy surface which defies any pencil, pen or marker. This means that it's difficult to both transfer images and to make them stay on the surface without rubbing off. I developed a method where I started by washing the material with soap and warm water, and then rubbing the surface dry with a paper towel, and thus removing most of the grease. I transferred the images by drawing with graphite on a piece of paper and then rubbing the image against the surface. I then used an alcohol marker to make the markings more permanent. They would still rub off, but they were a bit more permanent.

My method of mounting the stamps that I've carved is to use an acrylic block, to which I've attached Tack'n'Peel by Tsukineko. Tack'n'Peel is a sticky film, which you glue onto a block and can use over and over again. You just attach the stamp to the sticky surface, and after you've stamped your image you peel off the stamp and your block is ready for the next stamp. That is a great space-saver!


Here I've played with the triangular knot stamp to create a pattern:


 I tried a self-portrait, a lace pattern based on something that I crocheted many years ago, a leaf set (filling and outline) and several Christmas-related stamp.


I love this stamping technique, which I learned from Julie's blog.


Word stamp ("Merry Christmas"), and the beginnings of an alphabet set with Celtic-style letters:


These swirls are simple, but took a long time to carve since the lines are so thin. I removed a lot more material than what was left on the stamp.


I very much enjoyed making these stamps, and I appreciated the fact that you don't need a lot of materials and tools to do this, and there is wery little cleaning up afterwards. A lot of the things I like to do demand a lot of organisation and tidying up afterwards, so this was definitely fun for a change! These exercises gave me a lot more confidence, and I know that it'll be much easier to pick up some SoftCut and make more stamps now that I've developed a technique and seen what is possible. I hope I've inspired you to pick up a piece of rubber or linoleum, and to give it a go too!

Thanks for visiting, and see you again soon!


26 January 2012

Stamps #8 to 12

Here are the last five stamps in my 12 Days, 12 Stamps challenge. My mock carvings inspired me to move onto runes, but first I decided to challenge myself and the craft foam with a more intricate letter. I simply wrote a capital A in a font I liked in a text editing programme, enlarged the letter until I was happy with the size and traced it right off the screen. I cut it out very carefully and got two stamps out of one: a positive and a negative image. Fun!

I've been rather busy this week, so the runes were a good choice as they were simple to make. I picked the ones that spell my name. I hope I picked the right rune for A, because there were two different ones, and I didn't have time to study them further then. It seemed a bit complicated. I'm planning to make the whole futhark eventually.


Here's the whole collection together with my sketchbook:


I haven't yet decided what my next challenge will be, but I'm thinking about a "try-something-new-every-day"-challenge.

21 January 2012

Stamps #4 to 7

Things were starting to feel a little too geometric, so I decided to move on to more organic symbols. I'm interested in symbols and signs, so when I found a book about symbols on sale a couple of weeks ago, I bought it. It's written by a professor, so it should have some scholarly merit, but I mainly bought it for the beautiful artwork, to use for inspiration.

I've been planning to make a series of stamps based on ancient rock carvings and runes (please refer back to this blog entry for more on that subject). While doodling at a seminar last weekend I started drawing rock carvings that I made upp - mock carvings, you could say. They're based on real rock carvings that I'm familiar with, but I tried to avoid drawing them exactly like the real ones.


Mock carvings


My first plan was to turn these doodles into stamps, but then I had another idea. I decided to take objects in my home that didn't exist in prehistoric times and make them look like something that prehistoric man might want to carve into a rock.


Mock carvings inspired by objects in my home 
(a metal clip for a picture frame, a fork, a clock, a paper clip)


I made one practical discovery:
For more intricate shapes and small curves it's better to use something other than craft foam, unless you don't mind a jagged line.

And one interesting discovery:
I transfered the image to craft foam by drawing it with a soft leaded pencil on a piece of paper, flipping the paper over onto craft foam and rubbing the back of the paper. To reinforce the line I used a purple multimark pen. Here's the discovery: after I'd stamped the image I made a second (ghost) stamp and to my surprise, the purple line transferred:


This could be a bad thing, but it could also be used for some really cool effects:


The scan is of pretty poor quality, but I'm sure you can still see the markings I've drawn with a yellow multimark pen on the fun foam before I applied the ink. This has potiential, don't you agree? It just needs a bit more experimentation, because I don't know yet what it is that makes the pen lines trasfer. I used VersaCraft ink. Perhaps the ink dissolves the permanent ink in the multimark pen.

17 January 2012

Stamps #3a and 3b

When I made stamp #2 I was left with 4 little squares. I took these and made what I think of as Charles Rennie Mackintosh squares; in this case a single square and a triplet of squares. Here, however, I didn't use them in any particularly Mackintoshish way. Just a play with squares. The patterns on the right side of my sketchbook were made with the single square, but could be made into stamps of their own to save time, especially if you want to make chequered borders.

15 January 2012

12 Days, 12 Stamps

I've embarked on another little challenge for myself. This time it's about stamps. I still have certain problems with stamps, and haven't completely figured out what they can do for me. But I'm getting there. My main problem with stamps has been that a lot of them are what Gwen Diehn refers to as 'determined materials' in her book The Decorated Page, i.e. materials that themselves carry a strong message that may override your own message. I've written about my relationship to stamps before here and here.

To help me along with my stamp-making I decided to challenge myself to make a stamp a day for 12 days. The number is of no significance: it's just the number of squares that fitted on an A4 page in my sketchbook. To make things as simple as possible I'm going to make the stamps out of craft foam and mount them on a A4 transparency sheet that I've cut into 12 pieces. Please refer to my earlier blog entry for a description of the technique.

This challenge also ties in with this month's theme in The Sketchbook Challenge: Doodles. I haven't been active in TSC for months, and it's about time I got back in again. I've done some doodling this week and I figured that I could use my doodles as inspiration for stamp-making.

Here is a doodle I did yesterday. I like the way you can create texture with just a simple mark such as a small circle. I want to explore this more.


Here's another doodle - one that I did earlier in the week. There is a lot I could pick out from here for stamp-making.


I'm going to start with the three small dots that have followed me since I was a teenager. They have a tendency to sneak into my drawings as soon as I look away, so I might as well embrace them as Lundadoodle no 1.


Apparently this is a mathematical symbol meaning 'Therefore', when the triange is standing on its base, and 'Because', when the triangle is top-down. I like that.

25 September 2011

A Job Well Done

To my great relief, the project that has been my bane at the office for the last four weeks was finally wrapped up on Friday. To celebrate, I went by a chocolaterie on my way home and bought four handmade pralines to enjoy with a cup of tea. Flavours: champagne, cherry-orange, strawberry-lime and mocha.

Makes your mouth water, doesn’t it?


After tea and chocolates, inspiration descended upon me and I made my first multicoloured stamp. I learned this technique from Melanie Testa and Patricia Gaignat at least a year ago, but haven’t tried it before now. There are a number of circumstances why the time was ripe for me to try it now, and here are the top three:

1. Melanie has been making and using multicoloured stamps a lot lately, and has blogged about it, so that whetted my appetite.

2. At the crafts fair that I visited a couple of weeks ago I found double sided self-adhesive film, which makes it super easy to attach craft foam shapes to transparencies. So far I haven’t been able to find self-adhesive craft foam here, so this is the second best thing. What a relief not to have to mess around with glue any more!

3. A few months ago I came across an interesting product called Tack-n-Peel (by Tsukineko). This is a sticky and reusable cling sheet that you can attach to a piece of acrylic. You can then use this print block for unmounted stamps or [...drum roll...] craft foam shapes that are attached to a piece of transparency.

This craft foam, self-adhesive film, transparency and Tack’n’Peel on a block of acrylic combo is a real winner in my world, because these stamps are easy to make, the materials are inexpensive, the transparency backing is a real space saver, and the cling sheet on a block of acrylic gives the flimsy transparency backed stamp stability when needed, AND it creates a transparent print block, so you know exactly where you place your stamp. The advantages never seem to end. I’m sold.

Different parts of a multicoloured stamp. 
Many of these shapes can also be used on their own.


The stamped image


Now I need to think about inkpads. My collection of inkpads isn’t very big, as I haven’t been much into stamping so far. Here’s another blog entry where I discuss stamping. However, when stamp-making has become as easy as this, I might actually catch the pox and start making more stamps. They are after all a great way of trying out ideas in your sketchbook.


PS. Look at these yummy scissors (from Fiskars) that a friend gifted me! Don’t they make you wanna pull out your fabrics and start cutting? 

9 April 2011

Branching Out

This month’s theme in The Sketchbook Challenge is ‘Branching Out’ – expanding your skills, sprouting new ideas, discovering unknown territory. One pretty unknown territory for me is stamping. I seldom use stamps on fabric, I’m not a scrapbooker, and since I’m still struggling with regular journaling, I haven’t got a habit of using stamps in my journals either.

However, I can see why stamps would be a good addition to my repertoire, so when Melanie Testa recently published a fun little tutorial on incised foam stamps, I decided to branch out.

I know a lot of people love to use stamps, but I’ve discovered that for some reason my relationship to stamps is complicated. I love to look at stamps in the shop, but if I feel like buying one, I often stop myself with the questions: When am I going to use it, and how many times? Is it really worth buying it? Shouldn’t I make my own personal stamp instead of using a commercial and impersonal one?

Then, when I’m faced with the task of making my own stamps, I get confused by the endless possibilities. Which motif should I go for? Which one will I want to use over and over again? Which one is worth the effort? I find it difficult to make a stamp unless a have a clear idea in my head of what I’m going to use it for.

I guess I just need to make more stamps, and play with them. The more stamps I make, the less pressure is attached to each single stamp. The more I play, the more I will come up with ideas on how to use them. It’s as easy as that. And Melanie’s tutorial really makes it easy. The materials are simple and accessible, and if I mess it up, I can quickly make a new stamp, or alter the one I’m unhappy with. This is where I’ll start. And if I get hooked, I can branch out even more and finally use that linoleum block and block of speedy-carve that have been sitting in my cupboard for far too long.

ps
If you think that you don’t have the right equipment for the method Melanie describes, use something else. I didn’t have sticky back fun foam, so I used normal fun foam with double-sided tape. You could also use glue. I didn’t have an awl, so I used a thick sharp needle. And a blunt needle for the indentations. Use the things you have around the house.


Dig where you stand
I love Celtic knotwork, so that was a good place to start.

How about a motif without a background?

And how about a background without a motif?

Then, how about rejoining the motif and the background?

24 October 2010

Stämplar med plexiglas

För lite över en vecka sedan (14 oktober) laddade den förträffliga Melanie Testa upp en liten undervisningsvideo på sin blogg om hur man ska bära sig åt för att skära plexiglas till sina egenhändigt tillverkade stämplar. Fördelen med plexiglas är naturligtvis att materialet är genomskinligt och man ser exakt var man placerar motivet. Jag hade testat att skära plexiglas redan tidigare, men fick nytändning när jag såg videon och passade på att testa en idé som jag fick för några veckor sedan: att göra stämplar av gamla virkade spetsar. Den tredje stämpeln är gjord av skumgummi. Jag sökte fram några tygbitar som jag hade övat monotryck på och tryckte mina motiv på dem. Jag är ännu inte helt nöjd med resultatet, för den röda tygtrycksfärgen var för genomskinlig och resultatet är lite anemiskt. Så det kan hända att jag ännu jobbar vidare med dem.

Om ni undrar över plexiglaset, kan jag berätta att det är enkelt att få tag i. Jag gick bara in till en affär för glasprodukter och bad dem skära upp en lämpligt stor skiva plexi (akryl). Man kan också köpa restbitar som blivit över när de sågat plexi för andra kunder. Titta på Mellys undervisningsvideo så ser ni hur enkelt det är skära materialet! Slappna av, andas ut och knäck till!


Stamping with plexiglas

A little over a week ago (14 October) the excellent Melanie Testa uploaded a short video tutorial on her blog on how to cut plexiglas for making your own stamps. The advantage of plexiglas is obviously that the material is transparent and you can see exactly where you place your motif. I had tried cutting plexiglas before, but when I saw the video I was inspired anew and decided to try out an idea I got a few weeks ago: to make stamps with old crocheted lace. The third stamp is made from a foam sheet. I dug out some fabric samples that I had practised monoprinting on and printed my motifs on them. I'm still not completely satisfied with the result, because the red textile paint was too translucent and the result is a bit anemic. So I might work on them a little bit more later.

If the plexiglas bit is puzzling you, I can reveal that it was very easy to find. I just went into a shop for glass products and asked them to cut a sheet of plexi (acrylic). You can also buy left over pieces from when they have cut plexi for other customers. Have a look at Melly's tutorial and you will see how easy it is to cut the material. Relax, breathe out and snap!