Showing posts with label Alabama Chanin. Show all posts

28 February 2014

Ragtime

While you're all waiting for me to reveal more about my recent explorations into fabric marbling - oh, I can feel the anticipation growing!! (or then again, perhaps not...) - I'll share another quickie with you.

Many of you know by now that I'm a great fan of Alabama Chanin. Some weeks ago I decided to make an Alabama Chanin rag boa, from Natalie Chanin's first book Alabama Stitch Book. I got out a bunch of old t-shirts that I'd saved (since I bought her books, I haven't been able to throw away any old t-shirts). The instructions were simple enough: cut strips in three different widths and stack them on top of each other in five layers (with the biggest strip in the middle of the sandwich). Add more strips lengthwise until you have a multiple-layer fabric strip long enough to make up a boa. Sew them all together with a seam that runs in the middle of the strip the whole length of the boa. Then cut into the strip from the sides to make a fringe.

My collection of old tees (guess what my favourite colours are):


The finished boa


in close-up


And now I'm only waiting for spring to arrive so I can 
throw the boa around my neck and hit the streets.


Thanks for visiting, and I promise I will write about marbling soon!

- Annika

31 December 2013

Happy and Creative New Year 2014!

It's been all about slow stitching this Christmas, and mostly about Alabama Chanin. I've been working on the fabrics I stencilled earlier, and finished the cuffs fairly quickly.


I then moved on to another hat (in this country you can't have too many hats, cuffs, mitts and socks),


on which I'm also making good progress.


But it's not all about hand stitching. I also wanted to try machine stitching an Alabama Chanin project, and started with a sashiko-inspired pattern ('Seven treasures'). The image below isn't patricularly inspiring, but as you can see, I'm using tissue paper as a stitching guide in this case, instead of stencilling. The beige fabric is the backing fabric, which will be revealed when I cut through the top fabric, which is violet. More images later, when I've made more progress.


Thank you for visiting my blog! I  wish you a very Happy and Creative New Year 2014. May your life be filled with happiness, and your stash bursting with inspiring supplies!

- Annika


21 December 2013

'Tis the Season to Stencil, Part 2

My progress so far:

I used freezer paper and a well-used plastic stencil. The designs are 'Anna's Garden' from Alabama Studio Sewing + Design and 'Bloomers' from Alabama Stitch Book, both by Natalie Chanin. The project in the middle is my own design, but it's going to be a surprise for someone, so I can't reveal any details yet.


I felt that silver on black was a bit too much for what I had in mind, so I added black pigment to the silver paint and got a gorgeous hematite. The pink is a bit overwhelming, but part of it is going to be cut away, so I think it'll be ok.


Ready to stitch! The perfect Christmas project: easy, relaxing and meditative.

Thanks for visiting, and more news soon!

- Annika

20 December 2013

'Tis the Season to Be Stencilling

I'm back in the saddle again. Lots of creative stuff brewing around the house. Today I'm stencilling. I've been working on a freezer paper stencil for another Alabama Chanin-inspired project all morning. A lot of work, but it's going to be fantabulous when finished. At least if things go according to plan. A few more cuts and I'm ready to apply paint. I'm thinking silver on black.


The pattern is Anna´s Garden from the book Alabama Studio Sewing + Design.

More images soon. I'm pretty excited!

- Annika


12 August 2012

Return to Normal

This week I've returned to reality and in earnest started planning the courses I'm going to teach for the next eight or nine months. And I'm glad to say that I'm enjoying it! Getting up earlier in the morning, having meals at regular hours, working, feeling useful and purposeful. It suits me.

I finished the Alabama Chanin fitted top that I prepared the fabric for earlier in this post. With a few changes to the pattern it fits me well, and I'm all set for something more decorative next time. Appliqué, reverse appliqué, dimensional appliqué, couched... I haven't yet decided what to do for my next A.C. project, but I know it's going to be fun. Here's the finished top:


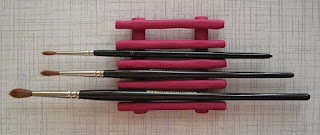
I've also done a little drawing and painting for Melanie Testa's workshop Dream Journals (you can still register). Head over to Flickr, if you're curious. Here's another fun little project I did this evening. I've been trying to find a brush stand like the one Melanie uses in her teaching videos, but without success. Then a friend told me that I could probably make one myself easily with oven-bake clay. Duh, why didn't I think of that? So here it is, my brand new brush stand in one of my favourite colours:


It's very simply constructed of seven rolls of clay that are stacked. I baked it upside down with kebeb skewers as support, to make sure it wouldn't sag in the oven:


That was a great little project. Brought out the inner kindergartener in me, and that's always satisfying.

Thanks for visiting and see you again soon I hope! - Annika

25 July 2012

Bloomers Bucket Hat

I'm out and about a lot right now, but in between errands, excursions and assignments I've managed to finish my bucket hat. I showed you the stencilled hat pieces earlier in this post. For decorating the hat, I used the reverse appliqué technique and added a simple beaded border along the edge.


I haven't yet started on the fitted top (follow the link above for an image of the printed fabric), but I believe it's coming up.

Thanks for visiting! More soon! - Annika

18 July 2012

More Stencilling!

There are certain names that I regularly return to in this blog. One of them is Melanie Testa, as you know if you've read my blog lately. Another name is Natalie Chanin of Alabama Chanin.

As soon as I finished my pretty purses I turned to another couple of projects that have been on my to-do list for a while. A couple of years ago I made myself a bandana according to the instructions in Chanin's book Alabama Stitch Book, but I've wanted to make myself a proper garment too. While I've been biding my time and soaking up knowledge, I've bought all three of her books, and have a whole Alabama Chanin library by now. I love all her books, and in the last one you get full-sized patterns for an Alabama Chanin wardrobe, along with instuctions, tips and inspiration. So the time is ripe to get started. I've also found it hard to just sit and watch while my friend Cheryl Razmus is whipping up garment after garment. Have a look at her gorgeous creations on Flickr.

I decided to start small and make a simple bucket hat and fitted top to try out the patterns before I embark on anything more complicated and time-consuming. So I dug out the good old 'Bloomers' stencil I used before for my bandana, and used it to print on the fabric for the hat


and for spray painting on the fabric for the fitted top.


The spray painting technique is what Chanin calls 'faded leaves' and the effect is created by spraying thinned paint onto wet fabric for a watercolour look. My paint didn't run as much as I expected, probably because the paint wasn't thin enough, or the fabric wet enough, but I'm pretty pleased anyway. I'll go for a runnier look next time. The main thing now is that I get an interesting fabric for trying out the pattern. I want to be sure of the fit before I invest all that effort into a more elaborate garment.

I'd just got rid of old, flaking nail polish when I got this new manicure. Oh well.


I didn't want to waste the paint that collected on top of the stencil so I flipped the stencil onto a piece of cotton and got this interesting texture.


I'm really exited about a new discovery I've made in the field of textile paint. Well, to be honest, I've known about these products for a long time, I just wasn't ready for them before now. I've mentioned the Finnish brand Emo Tuotanto's fibre reactive dyes before on this blog, but now I've also tried their mediums for printing on fabric. They have a thicker medium that is used for printing and a runnier medium that can be used for sun printing or spraying. The great thing about these mediums is that they come clear and you add the pigment yourself. So you can mix any colour you like in any consistency. I love it! Why haven't I used them before? (They also carry ready-mixed paints, which I have used until now.)

Liquid medium and print paste, along with liquid pigments to add to the mediums.


I realise that it might be difficult for my international readers to get hold of these products, but perhaps your own national brand carries something similar? Have a look around next time you are looking for textile paint! It's great fun to have the freedom to mix your own colours.

Thanks for visiting! To be continued... - Annika

7 April 2012

Happy Easter

My plans for the Easter vacation were very simple: to sleep, take long walks, finish a couple of projects and hang around with my folks and Fia the Terri(fi)er. So far, things have gone according to plan. I finshed a tank top with an Alabama Chanin-inspired motif on the back (you will recognise the peony from the market bag I finished recently)...


... as well as the slipover I started knitting in February.

 (See the bed cover? I finished that in 1998! Phew, that was a long runner. 
I don't think I'll do another one in a while.)

And here I hang around with the sweet Terri(fi)er.


Enjoy the holiday! - Annika