Showing posts with label fibre-reactive dye. Show all posts

9 March 2019

Cosmos, Part 1

Hello! I’m delighted that you are visiting my blog. Maybe you’re here because you’re curious about my latest art quilt? It's called Cosmos.


Making this quilt has been a long process, and from the start I decided to be open about how I work so that those who were interested could follow along on Instagram and Facebook and see how things evolved in real time. Regular posts on social media also functioned as a diary for me personally and were something that spurred me on in my work.

I have decided to write a series of blog posts about the whole process as a recap that ties everything together for both those who have followed me from the start and those who have joined at a later point, as well as for me personally. This first post is about the background story, the inspiration, my philosophy in art making and the first stages, where I dyed the materials I was going to use. The following posts will deal with design, machine quilting and creative hand quilting.

I made the decision to make this quilt on 2 August 2018, which means that it took me about 7 months to finish it, or 5 months if we disregard the 2 months when I needed a break and did other things. But the process had started in my head long before the actual decision to make a new quilt.

About 1.5 years ago stargazing and astronomy entered my life in a more structured way than before and when summer came I thought it would be fun to have cosmos flowers on my balcony. I adored their elegantly long and thin stems and it didn’t take long before I got out my sketchbook. And an idea started to quietly evolve in my head: a quilt with cosmos flowers as well as Cosmos, the ordered universe.


And then, weeks later, one night just as I was falling asleep it was if someone had pushed a button in my head, and I got out of bed and furiously scribbled down a rough sketch with ideas. Looking at that sketch now, it doesn’t look that much like the finished quilt. But this is often how my process starts: with messy scribbles on the nearest piece of paper.


When I make art quilts I like to colour my own fabrics, because that gives me creative freedom to do whatever I want. I’m not limited by the materials the shops have to offer, only by my own skills, and skills can be learned. In fact, learning new skills and gaining new knowledge is a strong driving force in my creative process. I love to learn new things.

So I started by experimenting with ice dyeing and fibre reactive dye as I wanted a soft and organic pattern in the area that would become a nebula (deep space object ACL 1, as I called it, a pun on the cataloguing systems used by astronomers). This was easier said than done with the type of dye I was using. It took me 4 attempts to get a result I was happy with, and only by ditching the ice and returning to the tried and true method of low water immersion dyeing.


The next step was to define the nebula. I started by cutting out paper roughly the size and shape that I preferred for the flower heads and arranging them on the fabric. I marked the outer edges of the nebula, first with string and then with basting stitches, to help me in the next step: overdyeing with black.


When it was time to add black, I thickened the dye for better control of where it went and used both a brush and my (gloved!) finger to distribute the dye. I removed the basting stitches at the end, to make sure they wouldn’t leave marks.


I then let it all dry before steam fixing the dye in a diy home steamer. (Instructions for making your own steamer can be found in this excellent book by C. Soderlund & M. Testa.)


After washing and drying the fabric I used thinned white fabric paint to spatter stars all over the surface. This is one of my favourite things to do: it’s pure magic to see how a shower of white paint can transform a surface into a starscape.


Then it was time to create a backing fabric. For an art quilt I prefer to dye the backing fabric too, as I consider it part of the whole. I decided to try ice dyeing with the same dye one last time. It didn’t work. However, I decided to use the fabric even though I considered it a failure, and afterwards I was very glad I did. The fact that it is very pale means that all the stitching can be seen easily on the back of the quilt. I decided early that the stitching should be mostly tone on tone, which means that a lot of my hard work can barely be seen on the front, unless you go very near the quilt. But the back bears witness of it.


Finally, I also decided to dye matching embroidery thread, partly because I wanted to try dyeing my own threads, and partly because it ensured that the thread would match the fabric perfectly.


That’s all for now. Next time I will talk about designing the flowers and creating the quilt top. Thanks for visiting my blog and I hope to see you here again soon for the next part of the story!


20 February 2017

Things Are Cooking in My Kitchen Again

It's been ages since I did any dyeing. Yesterday I decided to change that and to try something I haven't done before: acid dyeing wool with fibre-reactive dye. I have a knitted scarf with matching wrist warmers that I made several years ago from some lovely hand painted 100 % merino wool from Uruguay. You can see the original post I wrote about the wool and the scarf here.

The scarf

However, after the yarn had been knitted, the overall impression was a bit more orange and speckled than what I had expected and this has bothered me ever since. Well, I'm a dyer, so why should I let something like that bother me? So I got out my pot and dye and got started.

Double, double, toil and trouble. Fire burn and cauldron bubble...

I normally prefer cold-water and low-water dyeing techniques to hot water and immersion dyeing, but I enjoyed trying something else for a change. I haven't had much experience in dyeing wool and using an acid dye bath instead of an alkaline one, so I was curious to see the result. Wool takes a bit of patience as you can't rush the process unless you want your yarn or knitted garment felted in the process. Many of us have indeed personal experience of what happens when you throw a woolen garment in hot water and agitate it. I managed to make a trivet out of my favourite beret many years ago.

The result was perhaps not as saturated as I expected, but I love the way the original colours  (violet, orange and pink) still shine through even though the overall colour has been modified. The scarf is much nicer now that the lighter areas have been replaced with red.


Just enough red to even out the colour, but preserve some of the original colours.

I'm pretty sure this will be a renaissance for this scarf. In fact, I've even used it indoors today because it's so soft and cosy.


Thanks for visiting my blog! I hope I've inspired you to give overdyeing a go if you have some item of clothing in the back of your wardrobe that just needs a bit of colour adjustment. Just remember that synthetic fibres do not accept dye like natural fibres, so make sure you check the fibre contents first, and read the dye manufacturer's instructions carefully before you start! Have fun!


18 October 2015

Glorious Shibori

One of the nice things about having a blog is that it makes it possible to go back in time and see what you did years ago, and to see your own progress. Before 2011 I'd never even heard of shibori: tie-dye was what I'd tried a few times and thought was fun. Then - bam! - I discovered stitched-resist shibori through Quilting Arts Magazine and fell in love. My love wasn't immediately answered though, as my first explorations into stitched-resist shibori (the 'Shibori Shrimp' as I called it) was an utter failure. Not because of the stitching, but because of the dye. But that wasn't something I realised until two years later, in 2013, when I had a breakthrough with the Emo Tuotanto dye I'd been trying to use in the same way as Procion MX dye (which isn't available in Finland). All I needed to do was to keep the dye a little warmer, and suddenly everything worked as it should. Last year I made some very successful stitched-resist shibori fabrics, but never got round to showing them here on the blog. During the past few weeks I've explored even more shibori techniques, such as clamping, capping and pole-wrapping, and now I'm ready to show you what I've been up to! Yay!

Let's start with tied resist, ne-maki. I used rubber bands on one piece.


And string on another:


The nice thing about shibori is that the fabric is a piece of art even before it's been dyed.

Stitched-resist shibori is fascinating. Who would think that this scrunched-up piece


would end up like this:

Or this bundle

would look like this:

Or this weird hedgehog

 would turn out like this:

The last technique is an example of capping, where I used both stitching and plastic to create the resist. I overdyed a fabric that I'd previously folded and clamped with clothes pegs:


Which brings me to clamping, itajime, which means that you use shapes as resists. Wooden shapes are traditional, but I used acrylic shapes that I cut myself.


Apart from this circle resist, which Dad made for me with a saw.


Isn't it cool?

I used a diamond shaped resist for this fabric, which has been dyed twice:


This technique is called tesuji shibori, and the fabric is pleated and bound. I love the simple elegance of the pattern.


And here's an example of arashi shibori, or pole-wrapping, which has been dyed twice.


As you can see I've tried a number of different techniques, but still I've only scratched the surface. I have a long list of things I want to try, so I don't think this will be the last time you'll see shibori on this blog!
Thanks for visiting!

20 November 2013

Mango & Raspberry Sorbet

It's a very dark and gloomy time of the year in this part of the world. The days are short and the trees are bare. "The sun is spent" (John Donne), "The sedge has wither'd from the lake, And no birds sing" (John Keats), and so on... We haven't had any snow yet to brighten things up, so I'm doing my best to brighten up my world with fabric and dye.

I've made some wonderful discoveries about the Emo dye that I often use, which have helped me get results that are similar to those I've had with Procion MX dye earlier. What a thrill it is to open up a fabric bundle and discover the glorious colour you were hoping for! I could hardly contain myself the other day, when I discovered a way of using Emo with ice cubes.

Below are a few images to feast your eyes upon.

If you want fractured patterns, you need to heat up your Emo dye, and not just leave it batching, as you can do with Procion MX dye. Two months ago I didn't know how to achieve this degree of texture with Emo:

 
And if you recall the unsuccessful shibori shrimp from two years back (I thought it was old dye, but it was really cold dye that was causing the problem), you'll be pleased to see that the shrimp is a lot spicier now. This is done with mokume shibori, and I've sewn the stitches in a spiralling shape.


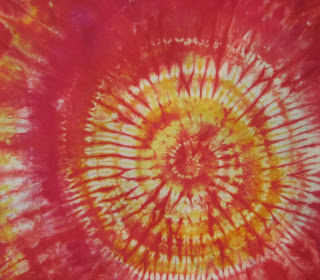
And the pièce de résistance, as far as I'm concerned, is this successful attempt at ice cube dyeing with Emo. Emo isn't overly fond of cold, but by putting the fabric bundle in a hot water bath instead of batching it on top of the fridge as I usually do with Procion MX dye, I got a wonderful result:


I love the combination of golden yellow and dark pink. Perhaps I should try to make it into a dessert: mango-raspberry sorbet? Yum!


Thanks for visiting and I hope to see you again soon!
- Annika

4 October 2013

C'est Parfait

My latest experiments with the Emo dyes have been parfait dyeing, but without ice cubes (which I blogged about here). The first version wasn't a great success (I will add images later after the fabrics have been dried and ironed), but the second version, which I whipped up tonight, looks more promising. Yum!


Thanks for dropping by! Stay tuned for the results!
- Annika

28 September 2013

I Can Dye Happy Now

One of the dyes that I frequently refer to on this blog is Procion MX dye. It's an easy and versatile dye that I enjoy using. There's just one problem: I can't find it in Finland. So I've looked at some of the dyes that are more easily available to me, and one that seemed well suited for the techniques that I have explored with Procion MX dye is a cold water reactive dye (based on Remazol) by the Finnish company Emo-tuotanto Oy. I have also mentioned this brand before on this blog.

To be honest, when I first started exploring the Emo dyes, I was rather disappointed. I did exactly what I did with the Procion MX dye, but I didn't get the effect I was looking for. What I got was something like what you see on the right, but what I really wanted is what you see on the left.


I assumed that the dye was so different from the Procion MX type that it just wouldn't work in the same way. However, after doing a bit of reasearch and making a few changes to the way I work, I have discovered that it is after all possible to achieve similar effects, and now I can dye happy.

First I did a 12-step gradation with the three primaries:


Then I did a 7-step gradation with a split complementary colour scheme:


And then I did a 5-step gradation with tints and shades:


And I love the results and the simplicity of my new method, which I'll get back to later. For now, I'll just let you feast your eyes on the rainbow that I have created. Looking at my stacks of ironed, neatly folded and colour co-ordinated hand dyes fills me with happiness and calm.


Yes, I was (am) one of those kids who will find great enjoyment and satisfaction in putting all the crayons and coloured pencils in the right order in the box.


The warm half of the rainbow


The cool half


Thanks for visiting!
- Annika