Showing posts with label Needle-felting. Show all posts

2 October 2011

Needle-felted Heart Ornaments

I'm sorry that it took me so long, but here, finally, are the directions for the needle-felted heart ornaments that I wrote about just over a month ago in this blog entry.


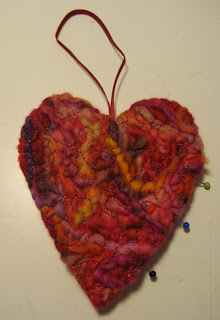
Needle-felted heart ornament


Materials:
  • 2 pieces of craft felt, approximately 12 x 12 cm (4.5” x 4.5”) 
  • scraps of yarn, embroidery thread, embroidery floss, etc. 
  • sewing or machine embroidery thread 
  • 1 piece of batting, approximately 10 x 10 cm (4” x 4”) 
  • 22 cm (9”) of narrow ribbon 
  • beads 
  • embroidery floss

Print the template in 150 dpi to ensure that the size is correct

Directions 

1. Arrange the fibres that you wish to needle-punch onto the felt on top of one of the felt pieces. If you use snippets of machine embroidery thread, it is best to place them under the wool, as that makes it easier to secure them.


2. Punch the fibres into the felt with a hand felting tool or a needle-felting machine. You just need to punch them until they stick reasonably well to the surface.


3. Secure the fibres with free-motion stitching or some other form of machine stitching.


4. Trace the heart template on the back of the needle-felted piece, but do not cut it out yet.

5. Place the felt pieces right sides together and stitch along the heart-shaped line, making sure you leave an opening that is approximately 5.5 cm (2 ¼”).

6. Cut around the heart and clip the corners and curves. You can also use pinking shears, in which case you don’t need to clip the curves. Turn the heart right sides out.

7. Trace the heart template onto the piece of batting and cut out the heart shape.

8. Poke the heart shaped piece of batting into the sewn heart through the opening. A tool such as haemostats or tweezers is helpful to get the batting in the right position.

9. Fold the ribbon in half and make a knot close to the raw edges to form a loop. Thread the looped end of the ribbon through a big needle and bring the needle inside the heart through the opening. Poke the needle through the fabric in the indentation on top of the heart and pull the ribbon through. The knot is now hidden inside the heart.


10. Whip stitch the opening closed.

11. Finish the heart with beaded blanket stitch, which is worked like this: take a stitch, thread a bead onto the embroidery floss and push it as far as it goes, take a new stitch, making sure that the bead sits on the loop that forms along the top edge of the stitch.


The finished needle-felted heart ornament


Good luck with your heart ornament!   


PS. Please let me know if you find errors in the directions so I can correct them!

21 August 2011

I felt like needle-felting

This summer I’ve spent a lot of time decluttering my home and getting rid of stuff that I’ve collected over the years. Yesterday I found yet another place where I’d hidden away a bunch of papers that needed to be sorted out. I’m more and more convinced that I was a squirrel in an earlier life.

While sorting out the cupboard where I mainly keep my craft supplies, I found a small box with bits of wool that were the leftovers from a rather ambitious slipover project that I knitted some years ago. The yarn was so beautiful that I hadn’t had the heart to throw it away. In the same box I also found snippets of machine embroidery thread that I had saved ‘for something’. While pondering whether to throw away or save these treasures, I decided on a third option: to make them into something right away.

A number of years ago I experimented a bit with combining yarn and machine embroidery. My first experiment was inspired by a Swedish textile artist, AnnLis Krüger, who uses yarn in her humorous art quilts. Her technique was to wind a bit of yarn around her fingers, place it on a piece of fabric and free-motion stitch it in place. I tried this method, thought it was fun, but a bit tricky, as you had to watch your fingers carefully and be on the alert for loops that got caught around the embroidery foot. Here’s little quilt I made with this technique:


My next experiment was to loosely knit a piece of  fabric, place it between two sheets of water-soluble stabiliser and free-motion stitch the surface to flatten the fabric and lock the knitted stitches in place. That was a lot safer for the fingers and there was no risk of the foot getting stuck on loops. This is what the knitted and stitched fabric looks like:


The embellishers/needle-felting machines that are on the market now open up the possibilities for combining yarn and fabric further. When I did my earlier experiments, I’d hardly even heard of needle-felting, let alone of any needle-felting machines for domestic use. I don’t think that I will invest in an embellisher, but I have bought a handy little tool that is a kind of hand-driven mini needle-felting machine:


So when I found that leftover yarn, I decided it was time to put the needle-felting gadget to the test. I used a piece of craft felt as the base, put a generous amount of fibres (yarn and machine embroidery thread) on top and started punching away. It took me a quite a while to punch the fibres in place (a machine would definitely be a lot quicker), but as long as the project is small and you are equipped with a bit of patience it’s doable. When the fibres were relatively well attached, I took the fabric over to the sewing machine and free-motioned on top to secure everything in place.


I then took my needle-felted fabric pieces and made them into these cute little hearts:


I’d be happy to post instructions on how to make these hearts if anyone is interested. Just leave a comment or e-mail me, and I’ll include the instructions in a future blog post.