One of my goals when I was on vacation recently was to explore Procion MX dyes in a variety of ways. I started by dyeing fabric with a low-water immersion technique (i.e. where you use just a small amount of dye instead of letting the fabric lie in a dye bath), and then I moved on to working with thickened dye. Some of my readers may be unfamiliar with the concept of thickened dye, so I'll explain it briefly. Thickened dye is simply a dye solution which has been thickened into a paste with the help of something like sodium alginate. Sodium alginate is made from seaweed, and mixed with water it turns into a gelly-like paste to which you add the dye. So why thicken dye and use that instead of fabric paint, you may ask? The main difference between fabric paint and thickened dye is that fabric paint lies on the surface of the fabric and stiffens it, whereas thickened dye is absorbed into the fibres, and when the excess dye and print paste is washed away, the fabric is just as soft as before. Depending on what effect you're after, you can work with either, or even both.
Today I want to share my experiments with direct dye painting and screen printing. I started my explorations into direct dye painting quite modestly by hand painting some x's on a monoprinted and sponge stamped fabric with a round brush.
After that I felt a bit bolder and made stronger marks with the brush, also on top of a monoprinted fabric.
The next thing I tried was to experiment with thicker and thinner dye. I kept adding water to the thickened dye while I was working, to see how thin I could make it before it became too thin. If the paint is too thick it's difficult to apply, but if it's too thin it'll spread too much on the fabric.
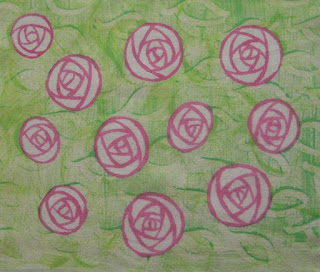
This rose was painted with thicker dye. It was pretty hard work to get the lines even.
This rose was painted with a very thin dye. It was easier to apply the dye, but as you can see, the lines are thicker and fuzzier than in the first rose.
The next sample was printed with a silkscreen over freezer paper bird shapes that I had ironed onto the fabric, and before I removed the masks I printed the surface with bubble wrap. After the masks were removed I filled in the details with thickened dye and a small brush. As expected, the lines that were painted on the dry areas inside the bird shapes wet on dry are crisp, whereas the ones I painted outside the birds wet on wet are fuzzier.
The next sample is only screen printed. It's an example of a positive print, where I've cut out a motif from ordinary printer paper and slid the paper with the tree-shaped hole under the silk screen and squeegeed thickened dye over the paper stencil.
I cut the tree out carefully with a craft knife and could use the tree shape as a mask and print a negative image too. I'm amazed at how crisp the lines are in these two prints. You wouldn't believe that these prints are made with a simple printer paper stencil, would you?
The printer paper stencil I used.
In this sample I used a commercial letter mask by Tim Holtz. Here I poured some purple dye over the screen before I pulled yellow pain with a squeegee. I love the effect!
In this last sample I dye painted a motif with a narrow flat brush. I did this sample last night and it is still batching. I enjoyed working with the flat brush, as I found it easier to make thick and thin lines with this brush than with the round brushes I tried earlier.
And that's all folks. I've put away all my dyeing utensils for now, and my little home is returned to order until the next time. Which I hope will be soon, because I've had a lot of fun and there's plenty more interesting things to try. So watch this space. ;-)
Thanks for reading this far, and I hope to see you again soon! - Annika


I absolutely love your experiments!!! The flat brush painting is beautiful and I am going to keep my eye out for Tim Holtz's letter mask. I love to combine colors on the screen to have them mix and mingle. Your Spider Lily, oh my! It is beautiful and the scents sounds fantastic. Wishing you a wonderful week.
ReplyDeleteThanks Jeannie! I can feel the scent from several yards away. It makes my heart soar. :)
DeleteA wonderful week to you too!
These are great tips and explanations!!! What other ways can I thicken dye?
ReplyDeleteThank you Yelena! I'm afraid I've only used alginate so far, so I can't give you advice on any other method. Here, however, is a link to a site that I've often found very useful, and if you're lucky you might find something there: http://www.pburch.net/dyeing.shtml. I've also played with the thought of using gelatine or water thickened with potato or corn starch (by boiling), but I haven't tried any of that yet. But it might be worth trying, if it's difficult for you to get hold of alginate. Good luck with your experiments!
DeleteThank you so much for the examples! Just starting using dye and trying to figure out how to get crisper lines. This was so helpful.
ReplyDeleteThank you Rachel! I'm glad that you found my examples helpful, and good look with your explorations!
DeleteThank you so much for showing your work!! I have been wanting to get screenprinting equipment but have not wanted to deal with all of the expensive dryers etc! I was hoping there was a way to get simple crisp images onto material and clothing and you made my dreams a reality!
ReplyDelete