31 July 2011

Back To Reality

Today was my last day of vacation, and it's back to the old grinding stone tomorrow. I'm pretty content, though, as I did manage to check off most of the items on my 'Want To Do' List. I've scrubbed and decluttered my flat, and got rid of a lot of useless stuff that I've collected over time. I suspect I was a squirrel in a past life, but this ex-squirrel will just have to learn new tricks now.

I've also tried shibori, gelatin printing, deconstructed printing and and a little bit of this and that. I will blog about some of these things within soon. Just stay tuned.

One of the things that makes me most happy is that I managed to stick to my plan to draw an object every day - without cheating even once! I spent about 45 minutes to 1.5 hours on these drawings and paintings, so I won't be able to continue in the same whay now that I'm back to work. There simply isn't time for it. However, I'm thinking I should devote one evening a week to drawing like this, to practise my eye and hand coordination. And another thing that I need to pracise is to regularly draw simple quick sketches that don't necessarily need to be very realistic or serious. For that I'm going to seek help from Carla Sonheim. I bought her book Drawing Lab for Mixed-Media Artists, which I hope will help me relax and let myself be silly when I'm drawing. In general I'm pretty good at being silly, so I don't know why it's so hard when it comes to drawing

Here are some of my 28 drawings. You can find them all here


I did my drawings on 7 A4 sheets that I folded in half. The reason for using loose sheets was that I knew I wanted to use paper of different quality, and also that sketchbooks intimidate me. I'm going to bind these sheets into a little book later. I found this a liberating way of working. Single sheets were also easy to carry with me on my travels.

28 July 2011

Deconstruction

At Uni I once took a course on deconstruction, which dealt with the poststructuralist theories of Jacques Derrida, Jacques Lacan and Julia Kristeva. I completed the course, but I was probably more confused after the course than before it. And I’ve been slightly suspicious of the word ‘deconstruction’ ever since. Perhaps I’d understand it better today if I gave it another chance.

However, since Tuesday the honour of the word ‘deconstruction’ has been restored. I finally tried deconstructed or breakdown printing. This printing technique, which was developed by Kerr Grabowski, is fun, easy, exciting, surprising and not least forgiving, which I’ll explain below. I’ll walk you through the basics of the process with illustrations.

You start by applying thickened Procion MX dye to a silk screen. Thickened dye is a dye solution which has been thickened with a sodium alginate mixture. It has to be dye, because you’re going to leave it to dry, so if you use paint, you’ll ruin your screen. After the dye has been applied to the screen you place textured objects over the dye and leave everything to dry. I applied a very thick layer, so it took almost three days before it was completely dry.

The screen is prepared with dye and textured objects and drying


 When the dye has dried and you've removed the objects you’re ready to start printing


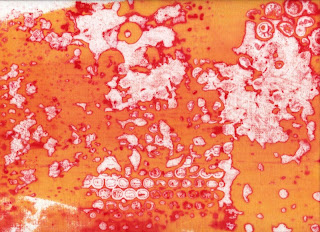
For printing, you will again use a sodium alginate mixture, with or without dye solution. The mixture functions as a release paste for the dried dye on the screen. The release paste moistens and releases the dry dye little by little, so every print has a new pattern. I used red dye for preparing the screen and yellow dye in the release paste. This is the result:

The first print


The third print


The fifth print


I’m really please with the results. I had some difficulties, but I found that the technique is very forgiving. The mistakes I made would probably have ruined the print with another technique, but with deconstructed printing you hardly notice them.

First of all I discovered that the well on my screen was too narrow and didn’t allow enough print paste to cover the whole printing area. I was too greedy when I prepared the screen with duct tape and thought that the bigger the screen the better. Not so. I need to add more duct tape to enlarge the well. If there’s not enough room for the amount of print paste you need for the print, you’ll run out before you reach the other side, and that may ruin your print. But, as I said, with this technique this is not a huge problem. There are white areas where the dry dye has resisted the print paste, so the places where white areas formed because there wasn’t enough print paste are hardly noticeable. Still, I will definitely enlarge the well on my screen.

This well is much too narrow


The other problem I experienced was that I had applied too thick a layer of thickened dye when I prepared the screen. First, the dye took forever to dry and, secondly, there were still after many pulls big clumps of dye on the screen that refused to be deconstructed. I had to work quite hard to get them off, and then they formed big lumps on the fabric instead. However, these lumps created very intense colour, so perhaps it wasn’t so bad after all. But it did feel like a waste of good dye. I'll try a thinner layer of dye next time and see what happens.

I really enjoyed this technique and will definitely try it again. It’s cool. It’s hot. It’s yummy!

26 July 2011

Things Are Cooking in My Kitchen

After a rather slow start, I’ve really got into swing with my experimentations now. Some have been successful, others less so. I wrote before that I’d like to try shibori, deconstructed (breakdown) printing and gelatin printing. By now I have tried them all and will report back in due course. Before that I’ll just share a few other projects that are already finished or in progress.

Softsculpt


This is a material that you heat up with e.g. an iron and then press onto/into an object or surface. The material retains the shape when it cools. However, if you’re not happy with the form or texture, you can reheat the Softsculpt to flatten it again, and redo the imprint. I have had this material for three years without trying it, until two days ago, when I finally was inspired. I probably spent an hour searching my flat for things that could be used for stamp-making (e.g. a vegetable brush, a piece of wood, a Christmas ornament, a quilting ruler, a candle-holder…). I haven’t yet tried the stamps, though.

Angie’s Fall


Perhaps you remember that I was very careful when I removed the stencil that I used for the pillow? One evening I was standing with it in my hand, wondering about how to store it, when I got an idea. It would make a great print on a t-shirt. So I picked out a t-shirt that I’d planned to print on and got cracking. I used the fabric paints that I bought in Edinburgh. Very luxurious result: they’re all metallic paints. Yum.
(And: I managed to remove the stencil without ripping it, so I’ll probably be able to use it one more time.)

Franka


I had planned to hunt for fabrics for Franka as soon as my vacation started, but I got busy with other things instead. Yesterday I had a rummage in my stash and came up with some yummy fabrics that I think will work. Here you see her top and skirt. But I still need to go on a hunt for water and skin tones. I’m excited, but slightly apprehensive. Those shapes will be a challenge to handle. Thank goodness for paper-backed fusible web. Without it this wouldn’t be possible.

24 July 2011

How to Open a Bottle of Sparkling Red Wine

1. Remove the little cage around the cork, grab a firm hold of the bottle with one hand and the cork with the other hand, holding your hand over the cork to stop it from popping out in an uncontrollable fashion, and slowly twist the bottle. Wait for the cork to slide out with an elegant popping sound.

2. If you haven’t managed to get the cork out of the bottle after 10 minutes, and sweat is trickling down your back and your hand is going numb, you need to change your method.

3. Get hold of the following equipment:
            a) a pipe wrench (Figure 1)
            b) an old rag and (c) an elastic band (Figure 2)

Figure 1

Figure 2

4. Place the rag (b) over the bottle, wrap the elastic band (c) around the bottle neck (Figure 3) and use the pipe wrench (a) to hold the cork while you slowly twist the bottle. As you can’t hold your hand over the cork this time, the rag in combination with elastic band will in the best case scenario stop the contents from dyeing your ceiling red (= d, the worst case scenario). Wait for the cork to slide out with an elegant popping sound.

Figure 3

 5. In the unlikely event that the cork should break in half (Figure 4) you need to find the following equipment:
            e) a wine opener (Figure 5)


Figure 4

 Figure 5

6. Screw the wine opener (e) into the cork and start removing the rest of the cork in a careful fashion. You might want to wrap the rag (b) around the mouth of the bottle to try to prevent d) from happening. Wait for the cork to slide out with an elegant popping sound.

7. Pour the wine into a suitable glass and enjoy the sweetness of your victory (Figure 6)

Figure 6

23 July 2011

Come Out and Play

A couple of evenings ago I decided that it was time to have a go at gelatin printing. A while back I downloaded Rayna Gillman’s workshop Gelatin Monoprinting, and on Thursday evening I prepared the print plate and watched Rayna’s workshop for inspiration.

As for the plate, I used a packet of Dr. Oetkers leaf gelatin, as that was the only brand I could find in my local supermarket. I used all 10 leaves in the packet with half a litre of water, which made the mixture slightly more concentrated than what the manufacturer recommended. I poured boiling water into a tin and mixed in the leaves, which had been soaked in water for about 10 minutes. The leaves melted instantly and made a lump and bubble free gelatine plate.

The gelatin print plate


As for Rayna’s workshop, I found it very entertaining. I kept bursting out into laughter, because Rayna’s approach is so far from the way I normally do things. I’m more like the people she refers to as neater and more organised. Not the back-to-kindergarten type. Or at least that's what I thought.

The gelatin plate is ready for action. 
I put it on an old book cover (The Laws of Finland, as it happens -
I have my sources) in case I needed to move it about. 


In action, though, the Truth is revealed. Or let’s put it like this: now I know what Rayna means. There’s something about gelatin printing that brings out the hidden kindergartener in you. After the initial disappointment with the results of my printing, it didn’t take more than 5 prints before I was applying the paint with my bare hands, not caring if the paint got under my nails. I thoroughly enjoyed smacking and rubbing the wobbly print plate, and there was something deeply satisfying about the messiness of it.

I quickly discovered that I liked working with a stencil, and I particularly liked the effects of ghost prints, so I made a whole series with the same stencil. 

Stencil printing, paint applied with fingers (a little too much paint on this one)


Ghost print. I like the ethereal and distressed look of this print.


Stencil printing. I placed the stencil so that the side which had paint on it from the last print was facing upwards. I like the contrast between the smooth background and the more textured area from the paint-coated stencil.


Another ghost print. I really like them.


Unfortunately the gelatin plate started to disintegrate a little too soon. After 5 prints the top layer of one corner came off, after 10 prints I was scraping off chunks of gelatin from my prints and after 15 prints I decided to call it a day. Perhaps this is normal. I have no idea how long a gelatin plate is supposed to hold up. But the next time I will try to add a few more gelatin leaves, as the plate did seem a little soft to me.

The print plate has done its job and big chunks of gelatin have come off 
in the process. I made some of the cracks myself to create texture, 
when the print plate was falling apart anyway.


Now I just need to figure out how to make the paint permanent. According to Rayna, ironing on gelatin is not advisable (apparently it smells, and there’s also a risk of burning), so I will let the paint cure for a few days, carefully wash off the gelatin and then hit the print with an iron.

A collection of the prints I made 


20 July 2011

Passiflora

A while ago I jazzed up a cool footstool Alabama Chanin Studio Style, and I’ve been thinking that it also needs a fabulous pillow to match. Before I went to visit my folks up North nearly two weeks ago, I prepared a bag full of fun to take with me, and while there I cut out a stencil and printed some fabric to embroider on my train journey home. I was in a hurry when I prepared this project, so to save time I chose to use Natalie Chanin’s Angie’s Fall pattern, with some modifications, rather than designing my own. Isn’t it a gorgeous pattern?

Stencil cutting out in the garden. I used Magic (freezer) paper and cut everything out with a pair of small and sharp scissors.


 The Magic paper stencil’s ready to be ironed onto fabric.


Fabric paint has been applied over the stencil and is drying overnight.


The fabric is now ready to be stitched. I was careful when I removed the stencil, and will be able to use it again for another project.


So far I’ve stitched one of the four flowers, following Natalie Chanin’s instructions for relief appliqué in her book Alabama Studio Style. I might also add beads later, to add a bit of glitz. 


This is an excellent project to work with on the go, so I might save the rest for tedious train journeys. But… I doubt that I will be able to stay away from it. I’m too eager to finish it.

19 July 2011

Baby Came Home to Mama

Phew, they just brought my lost suitcase home to me, and the contents were intact. What a relief. The bag certainly shows signs of having been on adventures of its own - it has been dragged through the mud, and the pull tabs on the zipper are gone - but I'm just grateful that it was returned to me.

Home again, dirty but intact


The Loot


Imagine the contents of this collection running amok in my suitcase. I did, and was not happy. But it ended well. Now it's playtime!

If any of you wonder what the three little shell-like thingies to the left are: they're ammonites (petrified prehistoric molluscs). I found them in a shop in the Grassmarket, Edinburgh, and just had to buy them. They're perfect for my stone and shell collection. I've been curious about ammonites for some time and was thrilled to find these.

The Kiss of Sweet Scottish Rain

I just returned from a trip to Edinburgh, Scotland, where I met up with good friends, visited my old favourite haunts, pigged out on Scottish delicacies, and splashed out on new art supplies. Unfortunately I won’t be able to play with the art supplies just yet, because my luggage was lost coming home. I hope it’ll all show up soon, and preferably in one piece. I bought 9 bottles of acrylic ink and 3 bottles of textile paint, so it’ll be a veritable disaster if they break.

I spent a year at The University of Edinburgh 1995-1996 and another 6 months working as a warden (guide) at the Palace of Holyroodhouse in 1999, in addition to which I’ve visited the city a number of times, so returning to Edinburgh is always like coming home for me. Some things have changed over the years and some have stayed the same. I find my way around the city and my favourite shops are still in business. Here’s a short presentation of our trip and of Edinburgh.


At the Mercat Cross. We had a lot of rain, but also brilliant sunshine. The weather changes quickly in Scotland, and like the true gentleman, I never left home without my umbrella. This photo is taken at the Mercat cross on the Royal Mile, which is the long street leading from Edinburgh Castle down to the Palace of Holyroodhouse.


Ye Olde Christmas Shoppe. I used to pass this shop every day on my way to work in 1999. Now we saw at least three shops that are specialised in all-year-round Christmas paraphernalia. Apparently Christmas can’t come early enough nowadays.


The Palace of Holyroodhouse. My workplace for six months. I loved working as a guide: you could hang around talking to people all day – AND GET PAID FOR IT!


The Scott Monument. You can climb to the top of this big monument over Sir Walter Scott. It looks like a medieval space ship, doesn’t it? Look at the thunder clouds in the distance. We were soaked on our way home to the hostel.


But not as wet and miserable as this poor pigeon, though.


Princes Street Gardens. The thistle is the national emblem of Scotland. The ones we found in Princes Street Gardens were the handsomest I’ve ever seen: a lot taller than me (ok, I’m not a very tall person, but anyway. Big.).


Edinburgh Castle. My former landlady and now dear friend lives on the other side of the castle rock, so the Castle used to be the first thing I saw when I left in the morning. Pretty neat, huh?

11 July 2011

Lazy Days Calling to You

My first week of vacation has flown past with mixed activities. In the first half of the week I did quite a bit of decluttering. One of my bookcases was overflowing with stuff, so I took care of that, and I threw away heaps of paper. I also spent time drawing. I did my first page for The Sketchbook Challenge, where I decided to use dragons to illustrate the four elements. I started with water. You can see the page on Flickr, where I’ve created sets to organise the stuff that I upload. In the set called ‘An Object a Day’ you’ll find the objects that I draw for each day I’m on vacation. I’ve managed to follow the rule to draw an object every day so far, even though it has meant that I’ve had to draw late in the evening, on a shaky train and after a glass of wine. Drawing every day, even in funny circumstances, makes it more spontaneous, and counteracts my need to create masterpieces every time I put pen to paper. I used to draw all the time when I was younger, but the habit dwindled down to less and less, and for a number of years I didn’t draw at all. I wanted to, but felt totally helpless and blank as soon as I had paper in front of me and a pencil in my hand. Worst of all: it had become too much of an effort to draw –  too much work, too demanding, to much pressure. Crazy Days. I decided to upload my pages to Flickr, because it helps me stick to my plan. It makes it more difficult to cheat.  ;-)


 My travel sewing kit, drawn on a shaky train journey
 
However, by Wednesday I was starting to feel a bit desperate, because I didn’t feel that I was really enjoying my vacation. The days were like any old weekend where I potter around the house. (I can have weird reactions in the beginning of my vacations. I’m sure there’s a psychological term for it…) I decided to take a train and visit a good friend in Snappertuna on Thursday. She met me at the train station and we set off to Fiskars Village. Those of you who use Fiskars tools: this is where it all started! Check out the cakes we had: 


Divine! This is when I felt that my vacation really started. Later we took a walk and ate wild strawberries that grew along the sides of the road. It was a great day.

On the train I started working on a shibori project. I was very inspired by Sue Cavanaugh’s article ‘Extreme Shibori’ in Quilting Arts Magazine (December 2009/January 2010 issue). I decided to try both the mokume and the ori-nui techniques in the same piece and prepared a piece of cotton beforehand:


In mokume you sew stitches through one layer of the fabric (red thread), whereas in ori-nui you fold the fabric and sew stiches through two layers along the folded edge (white thread):


This is what the fabric looks like when all the areas have been filled with stitch. The ori-nui stitches distort the fabric even before you start pulling the threads:


The treads are pulled and the fabric is ready for dyeing. It looks like I’ve created a little shrimp, doesn’t it? I’m quite excited about this technique, but I’ll have to wait a week or so before I can continue, because I’ll be out and about a lot.


Right now I’m back in Ostrobothnia, where my partner Jarkko and my parents live. I’ll stay here for a few days until Jarkko’s going fishing to Lapland and Mum and I are going off to bonnie Scotland. When we return from Scotland, I'll probably stay in Helsinki and then I'll get out those Procion MX dyes that I'm burning to try again.

We went swimming yesterday, but the water was too brown with humus for us to even consider snorkelling. We need to go by boat to the outer parts of the archipelago to find clearer water, but I suspect that the water is considerably colder there. I do miss swimming in Thailand. The warm, clear water and the funny, cute and handsome water creatures that I met there. Um.. speaking of funny creatures...

We had a little uninvited (but not unwelcome) guest the other day:


I almost stepped on this young cat that had snuck unnoticed into Jarkko’s flat through the open door to the backyard. It was extremely friendly, unafraid and curious, and made itself very much at home here.


It tried Jarkko’s keyboard, but it left the mouse alone.

Here, finally, is a sneak peak of my next project that I’m preparing for the next train journey back to Helsinki. More about that later.


A bag full of fun.

3 July 2011

A! fredome is a noble thing
(John Barbour, 1320?–1395)

The long-awaited summer vacation has finally arrived: How will I enjoy thee? Let me count the ways.

I’m hoping that this year’s vacation will be a balanced mix of lazy days, creative days, clearing the clutter days and travels. It seems like a waste to use one’s vacation for clearing out clutter, instead of just resting and generally enjoying life, but I’m pretty sure that by getting rid of a lot of the physical junk, I’ll also get rid of a lot of mental junk, which will boost my energy levels. I started by backing up my computer, and then I sorted out a big heap of paper. What a relief. I have more areas of my home that I will deal with soon, but one thing at a time. I’m on vacation, I remind myself.

I’m planning to draw and paint. The first thing I did after work on Friday was to go straight to the art department in my nearest bookstore and splash out on new art supplies: I bought a set of Derwent Inktense pencils and a set of Derwent Graphitint pencils. While I was backing up the files on my computer, I played with my new pencils. 


Inktense pencils. These are permanent when dry, so they can be used under other water media, and they can also be used on fabric I’m told. Ah, the possibilities! In the colour swatches to the bottom left I applied a wash of water on one half and let it dry, and then I applied a coloured wash over the whole swatch. You can see how differently the colours mixed. Aren’t these colours yummy!


Graphitint pencils. As a water medium I found these a bit trickier to get the hang of than the Inktense pencils, but I’ll keep on experimenting. I drew the leaf to the lower left with a 2B pencil and coloured it with Graphitint, the sprig is drawn with just Graphitint and a wash of water, and the leaf at the top with Graphitint and no water. I’ve only worked dry on dry so far, but I will also try dry on wet and lifting colour from the lead with a brush. I also want see how the colours mix if you overlay them with a coloured wash.

During my vacation I will challenge myself to draw an object from life every day starting from Monday. I also plan to participate in The Sketchbook Challenge. The theme this month is ‘Element’. Excellent! Although it’s not the most imaginative choice, I want to explore the four Classical elements: air, fire, earth and water. Perhaps through mythological beasts. That really gets me going, but I’ll have to be careful not be too ambitious, because that usually results in UFOs.

Another thing that I want to do is to explore Procion MX dyes. I have hardly used them since last summer, so I have a lot of catching up to do. I want to try shibori and deconstructed printing and perhaps gelatin printing. There’s so much out there to try!!

At some point I’ll visit my family in Ostrobothnia. Weather permitting, there’ll be boat trips and swimming. I’d like to try snorkelling too, but suspect that I’ll have to get a wetsuit for that. The water temperatures here aren’t quite what they were in Thailand. Neither is the underwater world, but I’m willing to give it a try, providing the circumstances are such that I don’t freeze after 5 minutes and sink to the bottom of the sea.

I’m also on my way to Edinburgh, which is about time. I haven’t been to bonnie Scotland since 2006. I lived in Edinburgh for a year as an exchange student, and again when I was working 6 months as a guide at The Palace of Holyroodhouse. Oh, happy days! 

As you can see, I have lots of plans (more than I’ve written here), and it is likely that I’ll only manage to do a fraction of what I want to do, as usual. Never mind. I’ll do my best to be realistic about things. I’m on vacation, I remind myself. I’ll report back on my explorations, so stay tuned!